Step 8: Finish
The Finish step is like the final read-through before you hit send on an important email — one last look at the whole picture before it goes live. Each earlier step saves on its own as you go, so this step is about confirming everything is right and completing setup.
Before you start
- You've gone through the earlier steps you need (at minimum, the Profile step). Anything you skipped can still be added later.
What you'll see
The Finish panel shows a summary of your agent's setup.
| Section | What's shown |
|---|---|
| Profile | Name, description, and avatar |
| Tools | The tools you turned on, grouped by type (native, connector, custom, database) |
| Knowledge Base | How many files and web pages, with the file names listed |
| Instructions | A preview of your instruction text |
| Conversation Starters | The starters you set up |
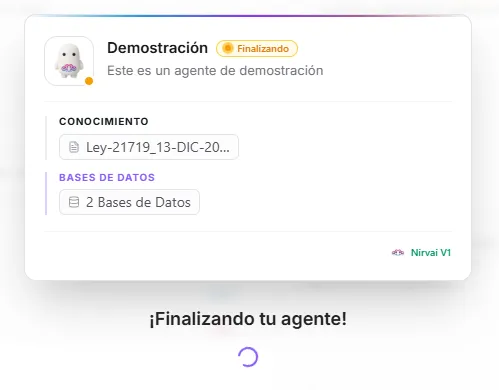 Image: The finish panel showing a complete summary of the agent's configuration
Make changes
If anything looks wrong, click that step's node on the canvas to go back to it. Each step saves on its own, so moving between nodes never loses your work.
Finish your agent
When everything looks good, click "Finish". An animated card appears to confirm your agent is ready. Here's what happens behind the scenes:
- Files are read — Knowledge base files are broken into small, searchable pieces. This may take a moment for large files.
- Web pages are read — Any web page links you added are opened and their text is pulled in.
- Setup is locked in — Your agent's full setup is checked and saved.
- Confirmation — An animated card confirms your agent is ready, with options to chat, connect it to a channel, or return to the Agent Control Panel.
Once you finish, the agent is available in Nirvai Chat right away. To use it on WhatsApp, Slack, or other channels, you'll need to connect it to a channel.
After finishing
The confirmation card gives you quick links to your next steps.
| Action | Where |
|---|---|
| Chat with it | From the confirmation card, or click the agent card in the Control Panel → "Chat" |
| Connect it to channels | Deploying to Channels — also a node on the canvas |
| Add skills | Skills — also a node on the canvas |
| Connect databases | Databases — also a node on the canvas |
| Edit its setup | Click the agent card → "Edit" (reopens the creation flow) |
| Use in tasks & automations | Tasks & Automations |
| Turn on Developer Mode | Developer Mode |
Test your agent
Before connecting it to a channel or using it in automations, always test your agent in chat:
- Open the agent in Nirvai Chat.
- Ask the kinds of questions your users will ask.
- Try edge cases — questions outside the agent's job.
- Check that its tools work correctly.
- Confirm the tone and reply format match your instructions.
Troubleshooting
If something doesn't work as expected, edit the agent and adjust the relevant step. The most common issues:
| Problem | Fix |
|---|---|
| The agent ignores the knowledge base | Confirm the files finished processing. Try more specific questions. |
| The agent uses the wrong tool | Add clearer instructions about when to use each tool. |
| Replies are too long or too short | Add a formatting rule in instructions ("keep answers under 3 sentences"). |
| The agent goes off-topic | Set clearer limits in instructions ("only answer questions about X"). |
| The agent misses content that's in a document | Use the same wording as your documents when asking. |
What's next
After this, connect your agent to a channel — see Deploying to Channels.