Step 7: Channels
Connecting your agent to a channel is like giving it its own front door — WhatsApp, Instagram, Slack, or your website — so customers can walk up and start a conversation wherever they already are. Once your agent is built and tested, you connect it to the channels where your users will reach it. Nirvai supports messaging apps, team collaboration tools, and your website.
Before you start
- A saved agent you've tested in the chat preview
- For Meta channels (WhatsApp, Instagram, Messenger): a Meta account you can sign in to. If you've already saved Meta credentials in Integrations → Credentials, connecting is faster — but it's not required.
Available channels
Messaging channels (Meta)
| Channel | What users do | Limit |
|---|---|---|
| Message your agent through a WhatsApp Business number | One WhatsApp number per agent | |
| Message your agent through your Instagram business account DMs | One Instagram account per agent | |
| Messenger | Message your agent through your Facebook Page's Messenger | One Page per agent |
Meta channels require your Meta account sign-in details. You can connect one Meta app account per agent.
Team channels
| Channel | What users do |
|---|---|
| Slack | Chat with your agent in a Slack workspace channel or by direct message |
| Discord | Chat with your agent in a Discord server channel |
| Telegram | Message your agent through a Telegram bot |
| Microsoft Teams | Chat with your agent in a Teams channel or chat |
Each platform has its own setup steps — follow the prompts shown in the app to connect. These channels don't use credentials from Integrations.
Web channels
| Channel | What it is |
|---|---|
| Web Embed | A full chat interface you place inside your website |
| Chatbot Widget | A floating chat bubble on your website that opens when clicked |
| API | A connection for developers to reach your agent from their own apps |
Web channels don't need any outside sign-in details — Nirvai generates the code or access key for you.
Step-by-step
- Open your agent in the Agent Control Panel
- Go to the Channels panel
- Select the channel you want to connect
- Follow the setup for that channel:
- Meta channels — sign in to your Meta account, or pick an existing Meta credential to speed things up
- Team channels — follow the platform-specific steps shown in the app
- Web channels — copy the code snippet or access key
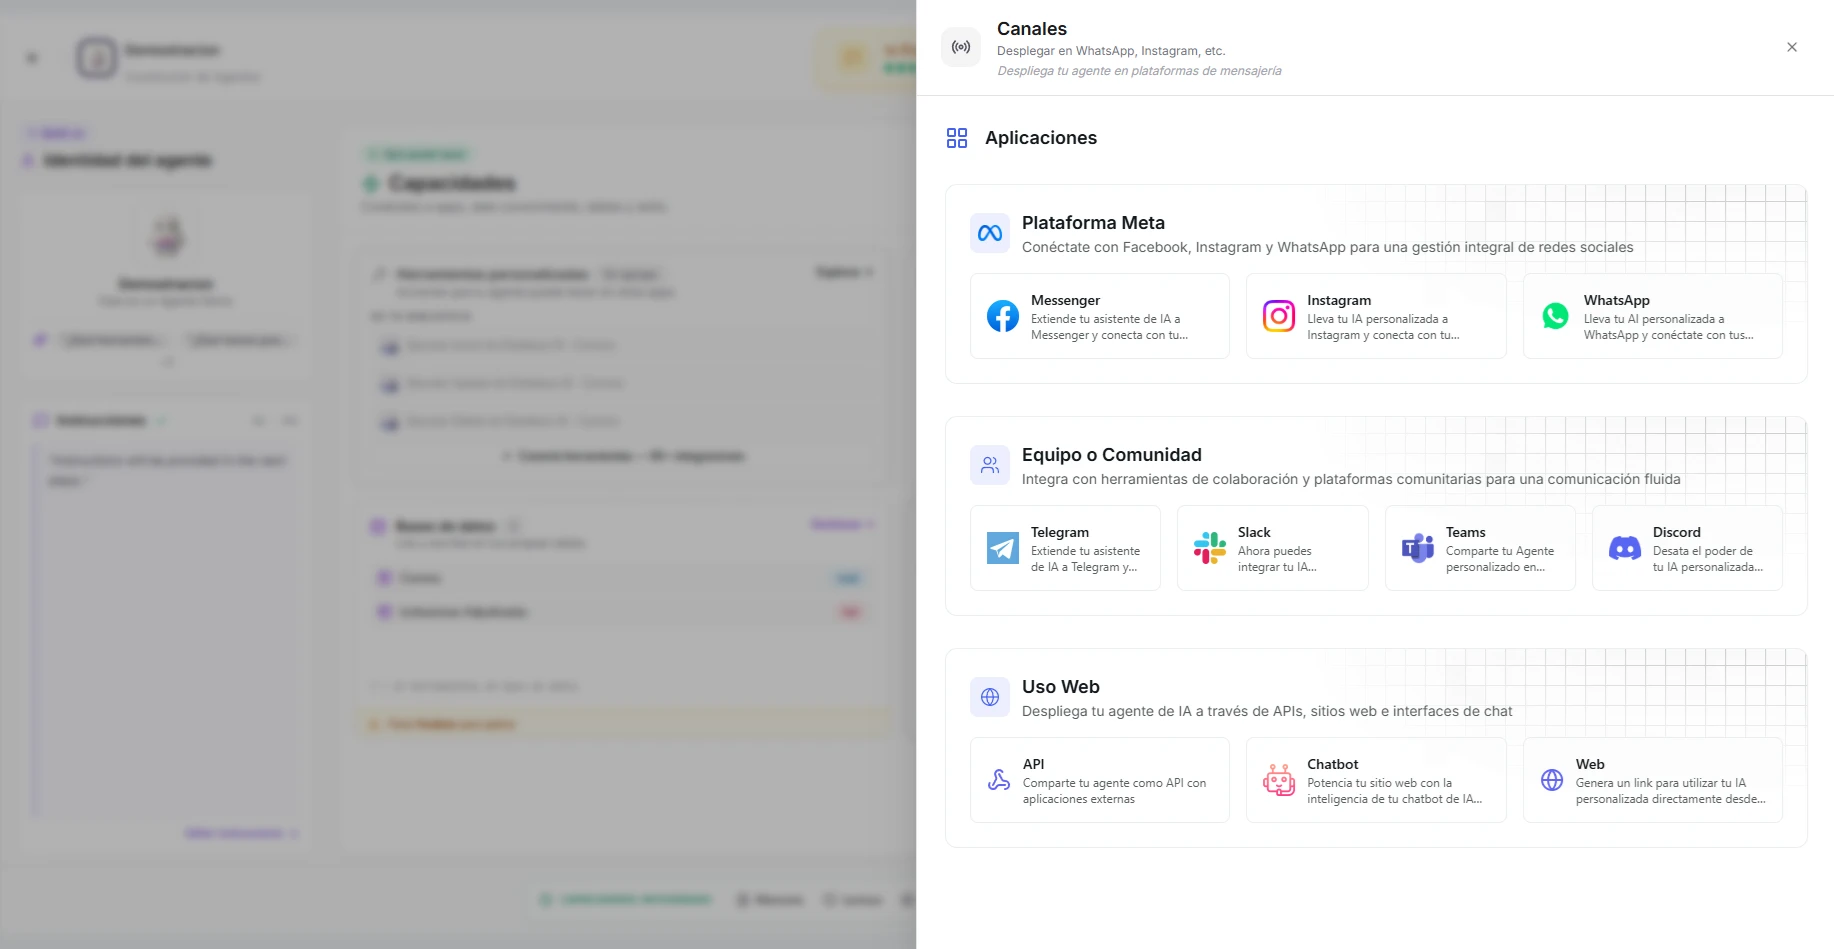 Image: The channels panel showing available deployment options
An agent can be connected to several channels at once. They all share the same setup — when you change the agent's instructions, tools, or knowledge, the change applies everywhere.
How the agent behaves across channels
Your agent acts the same way everywhere — same knowledge, same tools, same instructions. A few presentation details depend on what each platform supports:
| Feature | Messaging & Team | Web |
|---|---|---|
| Conversation starters | Not shown | Shown as clickable buttons |
| Rich formatting (tables, lists) | Depends on the platform | Full support |
| File sharing | Depends on the platform | Full support |
| Agent avatar | Shown if the platform supports it | Always shown |
| Typing indicator | Depends on the platform | Always shown |
Meta channel restrictions
Meta channels (WhatsApp, Instagram, Messenger) have one specific rule: each agent can be connected to one number or account per Meta channel type.
| What this means | Example |
|---|---|
| One agent → one WhatsApp number | "Sales Bot" is connected to +1-555-0100. You can't also connect it to +1-555-0200. |
| Different agents → different numbers | "Sales Bot" uses +1-555-0100. "Support Bot" uses +1-555-0200. |
| Multiple channel types are fine | "Sales Bot" can have WhatsApp and Instagram and Messenger at the same time. |
Web Embed & Chatbot Widget
For your website, Nirvai generates a small code snippet you paste into your pages.
Web Embed
A full-page or inline chat interface. Best for a dedicated support page or knowledge base.
<!-- Paste in your HTML where you want the chat to appear -->
<script src="https://nirvana-ai.app/embed/YOUR_AGENT_ID.js"></script>
Chatbot Widget
A floating bubble in the corner of your site that opens a chat window when clicked. Best for keeping the agent within reach across your whole site.
<!-- Paste before </body> on every page -->
<script src="https://nirvana-ai.app/widget/YOUR_AGENT_ID.js"></script>
Both options are customizable — you can set the position, colors, and opening greeting.
API access
For developers, Nirvai provides a connection your own apps can call — useful for building your agent into custom software, mobile apps, or back-end services. The details are in the API channel documentation.
Disconnecting a channel
To remove an agent from a channel:
- Open the agent in the Agent Control Panel
- Go to the Channels panel
- Click the disconnect button next to the channel
The agent stops responding on that channel immediately. You can reconnect any time.
Deactivating a channel
Instead of fully disconnecting, you can deactivate a Meta channel (WhatsApp, Instagram, or Messenger) to pause your agent for a while without losing any data — like flipping the sign on a shop door to "back soon" while everything inside stays put.
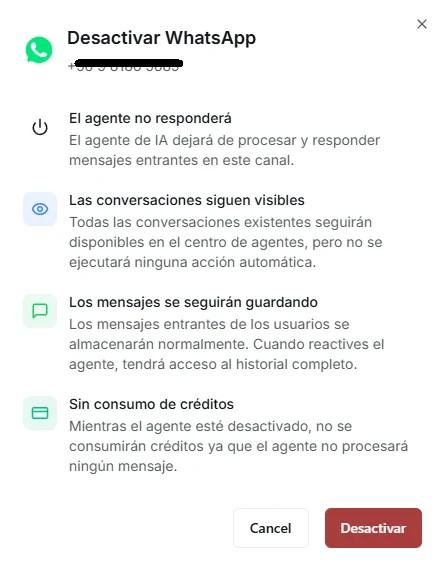 Image: Deactivation confirmation dialog showing what happens when you deactivate a channel
How to deactivate
- Open your agent in the Agent Control Panel
- Go to the Channels panel
- Toggle the active switch on the channel card
- Review the confirmation dialog and click Deactivate
What happens when deactivated
| Behavior | Detail |
|---|---|
| Agent stops responding | The agent won't process or reply to incoming messages on this channel |
| Conversations stay visible | All existing conversations remain available in the Agent Center |
| Messages are still saved | Incoming messages (text, images, audio, files) are stored as usual. When you reactivate, the full history is there |
| No credit consumption | While deactivated, the agent processes nothing — zero credits are used |
Reactivating
Toggle the switch back to active on the channel card. The agent resumes responding to new messages right away, with full access to the history that built up while it was paused.
Deactivation is handy when you need to pause an agent for a bit — during maintenance, outside business hours, or while you update its instructions or knowledge. Unlike disconnecting, you don't have to reconnect or set anything up again.
Deactivate vs. disconnect
| Action | Effect | To bring it back |
|---|---|---|
| Deactivate | Agent pauses — messages saved, no responses, no credits | Toggle the switch back on |
| Disconnect | Channel fully removed — agent is unlinked from the platform | Set up the channel again |
Troubleshooting
| Problem | Fix |
|---|---|
| Agent doesn't respond on WhatsApp | Check that the Meta credential is valid and the number is connected correctly. Confirm the channel is active, not deactivated. |
| Widget doesn't appear on the website | Make sure the code snippet is placed correctly. Check the browser console for errors. |
| Slow responses on a channel | The agent may have many tools or a large knowledge base. Simplify if you can. |
| Agent responds differently on different channels | This shouldn't happen — all channels use the same setup. If it does, look for platform-specific formatting issues. |
| "Channel already connected" error | Each Meta channel (WhatsApp, Instagram, Messenger) can connect to only one agent per account or number. Disconnect it from the other agent first. |
What's next
You've reached the last setup step. Head to Managing your agent to monitor conversations, review performance, and keep your agent running smoothly.