AI Setup
Think of AI Setup as hiring an expert consultant who already knows every tool and team member in your organization — you explain the goal in your own words, and they design the whole process for you. Instead of dragging boxes around and setting up each step yourself, you describe what you want in plain language and the AI looks at your agents, suggests a plan, and builds the entire automation. It lives right inside the Automations page.
This is the recommended way to build automations in Nirvai.
AI Setup
Describe your automation goal in plain language and the AI designs, builds, and checks the entire workflow
- A simple conversation -- no technical knowledge required
- The AI finds your agents and what they can do automatically
- Offers a few workflow options with pros and cons
- Builds, checks, and lets you test it from a single page
Before you start
- At least one saved agent in your account — AI Setup builds the automation out of the agents you already have.
- A clear idea of what you want to happen: when it should start, what each step should do, and where the result should go.
- The more specialized your agents are (with their own tools and uploaded files), the better the AI can match them to tasks.
The conversation flow
Every AI Setup session follows this sequence. You stay in control at each gate — the AI never turns anything on without your approval.
Starting a session
- Go to Automations from the sidebar.
- Click "AI Creation" at the top of the page.
- A landing page appears with template cards for common automation patterns (for example, daily reports, lead qualification, monitoring). Pick a template to fill in your starting description, or start from scratch by typing your own.
The page has two views, and you switch between them using the floating menu bar at the top:
- Chat — Where you talk to the AI. The conversation, the progress timeline, the agent cards, and the "ready" badges all show up here.
- Workflow — The setup page where you compare options, review what was built, test it, and turn it on.
The AI moves you between views at the right moments (for example, switching to the Workflow view when options are ready), but you can switch manually anytime using the menu bar.
Each session is independent — you can have several sessions running at the same time without them getting in each other's way.
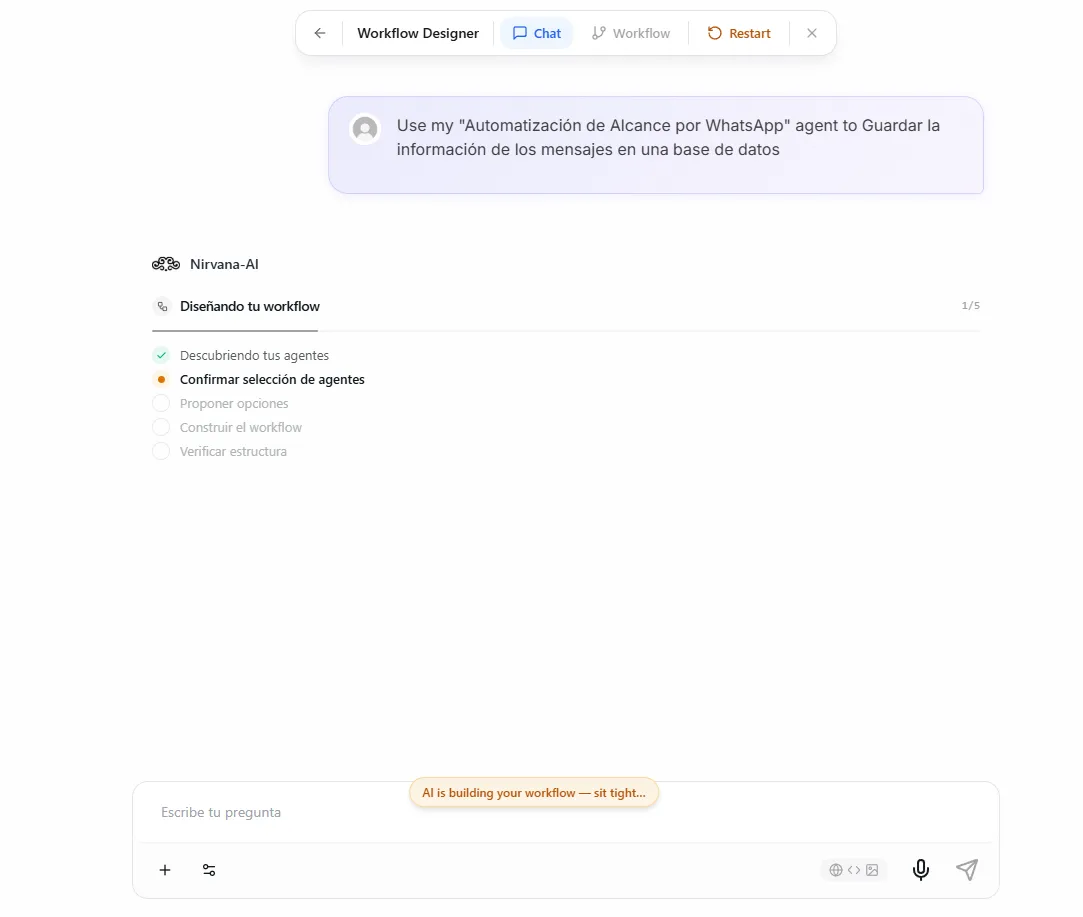 Image: The AI Setup chat interface showing the conversation view with the floating navigation bar at the top
Describing your goal
The quality of your description directly shapes the quality of the automation the AI builds. Write as if you're explaining the process to a colleague who has never seen your business before.
Clear prompts vs. vague prompts
| Prompt | Verdict | Why |
|---|---|---|
| "I want to monitor my competitor's blog every day, summarize new posts, and email me the summary" | Good | Clear start (daily), clear steps (monitor, summarize, email), clear result (email to me) |
| "When a customer submits feedback, analyze the sentiment, and if negative, create a support ticket" | Good | Clear start (form submission), clear logic (sentiment check), clear action (create ticket) |
| "Every Monday morning, pull our sales data, generate a performance report, and post a summary to Slack" | Good | Specific schedule, defined data source, defined output channel |
| "Make a workflow" | Too vague | The AI doesn't know what the workflow should do |
| "Automate my emails" | Too vague | Which emails? What should happen with them? |
Be specific about what should happen at each stage. Mention when it should start ("every day", "when a form is submitted"), the steps in between ("summarize", "analyze sentiment"), and the result ("email me", "create a ticket"). The more detail you give, the better the AI designs your automation.
Progress timeline
While the AI works, a progress timeline appears in the chat showing what stage it's at — reviewing agents, building the workflow, checking the structure, and so on. Each step shows a spinner while it's working and a checkmark when it's done.
If the AI finishes a stage and is waiting for you, the indicator turns into an amber dot to signal that it's paused until you respond.
Confirming the agents
After you describe your goal, the AI reviews the agents you have — looking at their tools, uploaded files, and skills — and suggests which ones should take part in the automation.
You'll see agent cards in the chat, styled like the agent cards elsewhere in Nirvai. Each card shows:
- The agent's avatar, name, and assigned role in the automation
- Tools (indigo) — the actual tools the agent can use
- Knowledge (orange) — the file names and links in the agent's uploaded files
- Skills (teal) — the skills the agent has
- A "Looks Good" button to confirm the selection
- A "Change Agents" button that opens a panel from the side
The agent picker panel slides in from the right and shows all your agents. The ones the AI recommended appear first with an "AI pick" badge. You can expand each card with "Show details" to see its full list of tools and skills, and switch agents in or out of the selection.
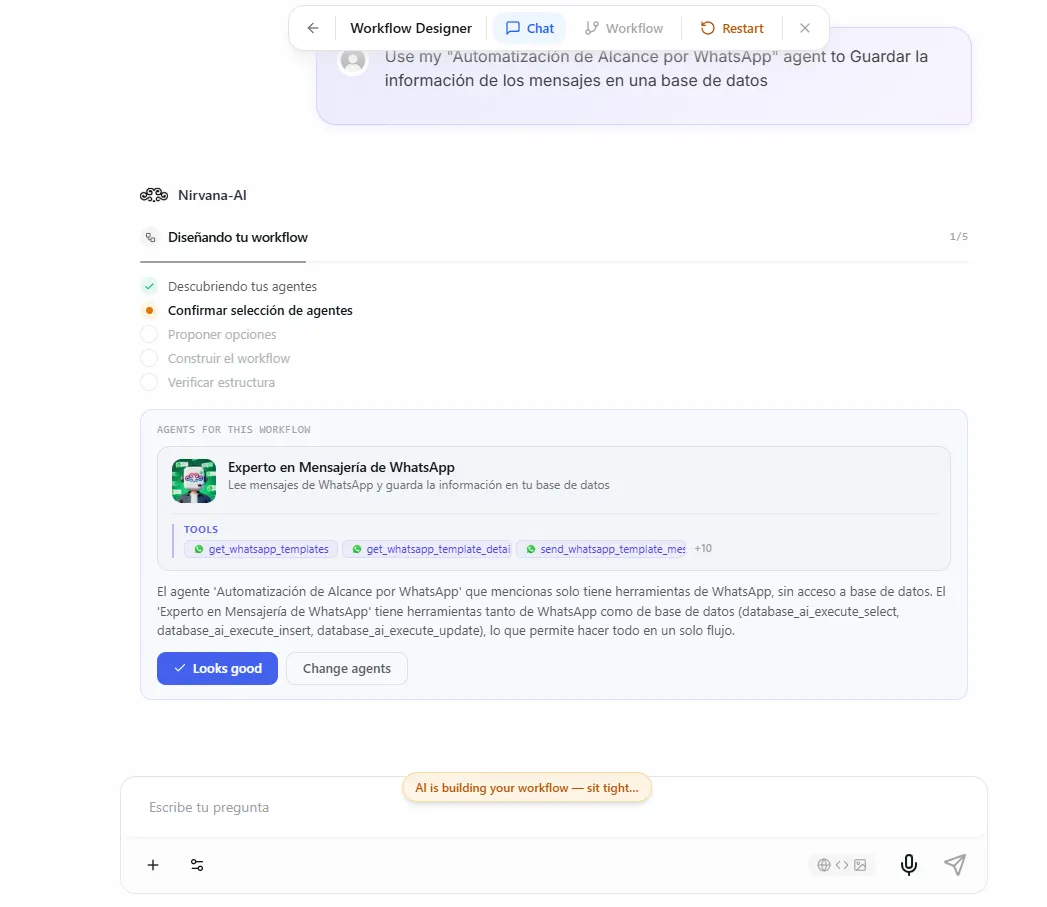 Image: Agent confirmation cards showing the proposed agents with their roles, tools, and knowledge
The AI picks agents based on what they can do. If you have a specialized agent with its own tools or uploaded files (for example, a "Competitor Research" agent that can read web pages), the AI will prefer it over a general agent for matching tasks. Review the suggestion carefully — the right agents make all the difference.
Choosing a workflow option
Once you confirm the agents, the AI offers one to three workflow options. A "Proposals Ready" badge appears in the chat, and the page automatically takes you to the Workflow view so you can compare them.
Every option card shows:
- How it starts — schedule, webhook, or manual
- Title — a short name for the approach
- Agents used — which agents take part
- Step count — how many steps the workflow has
One option is marked "Recommended" with a star badge. Below the cards, a side-by-side comparison shows each option's advantages (green pills) and tradeoffs (amber pills).
Click an option to select it — the card locks to prevent double-clicks and the page takes you back to Chat, where the AI starts building the workflow. You can also use the "Refine" box to send feedback and ask the AI to adjust the options before picking one.
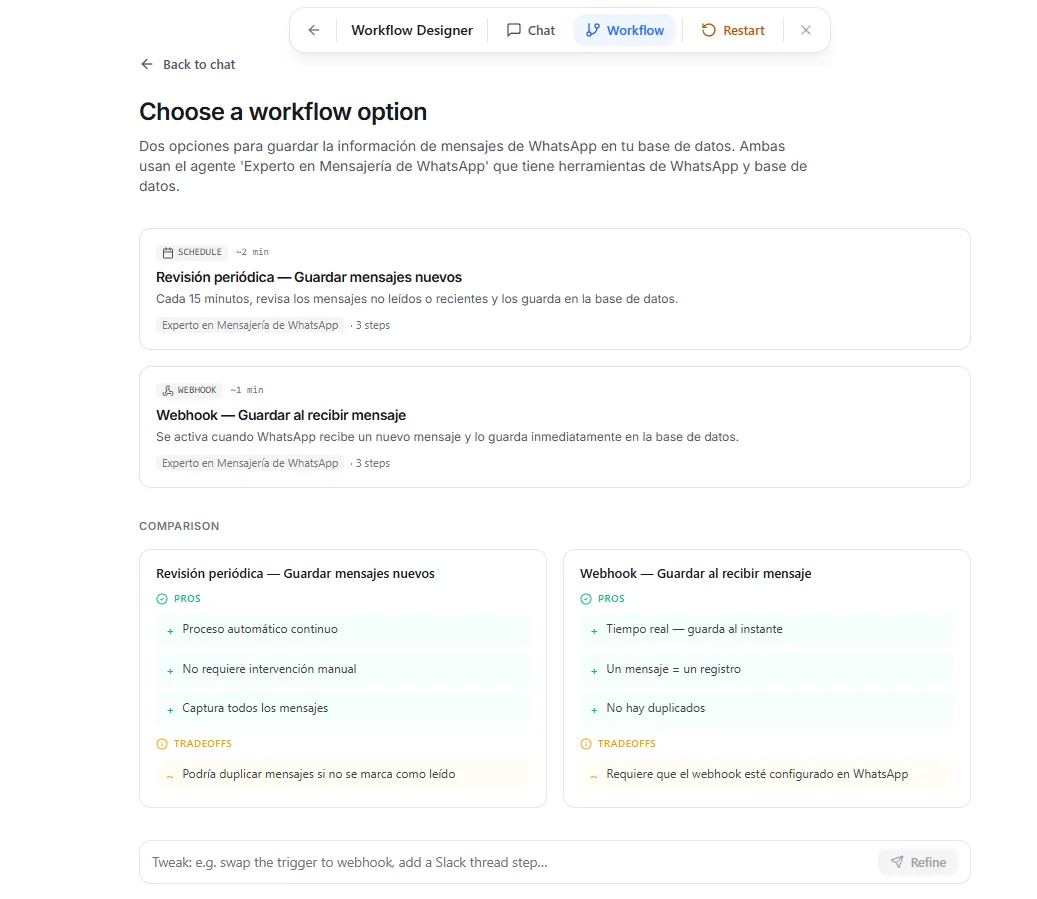 Image: The workflow options view showing three proposal cards with a recommended badge and a pros/cons comparison below
The setup page
After you pick an option, the AI builds the complete workflow and shows it on the setup page. This is your command center for reviewing, testing, and turning on the automation.
The setup page includes:
- Package sidebar (left) — Lists all workflows created in the current session with status badges (draft, tested, active). One session can produce several workflows.
- Header — The workflow name, a pill showing how it starts (for example, "Schedule"), and an execution mode badge ("Agile" or "Intensive").
- Agents section — Cards for each agent showing their profile image, name, and assigned role.
- Flow graph — A visual map of the workflow steps and how they connect, so you can see the whole structure at a glance.
- Steps summary — A detailed list of each step with its assigned agent, instructions, and what goes in and comes out.
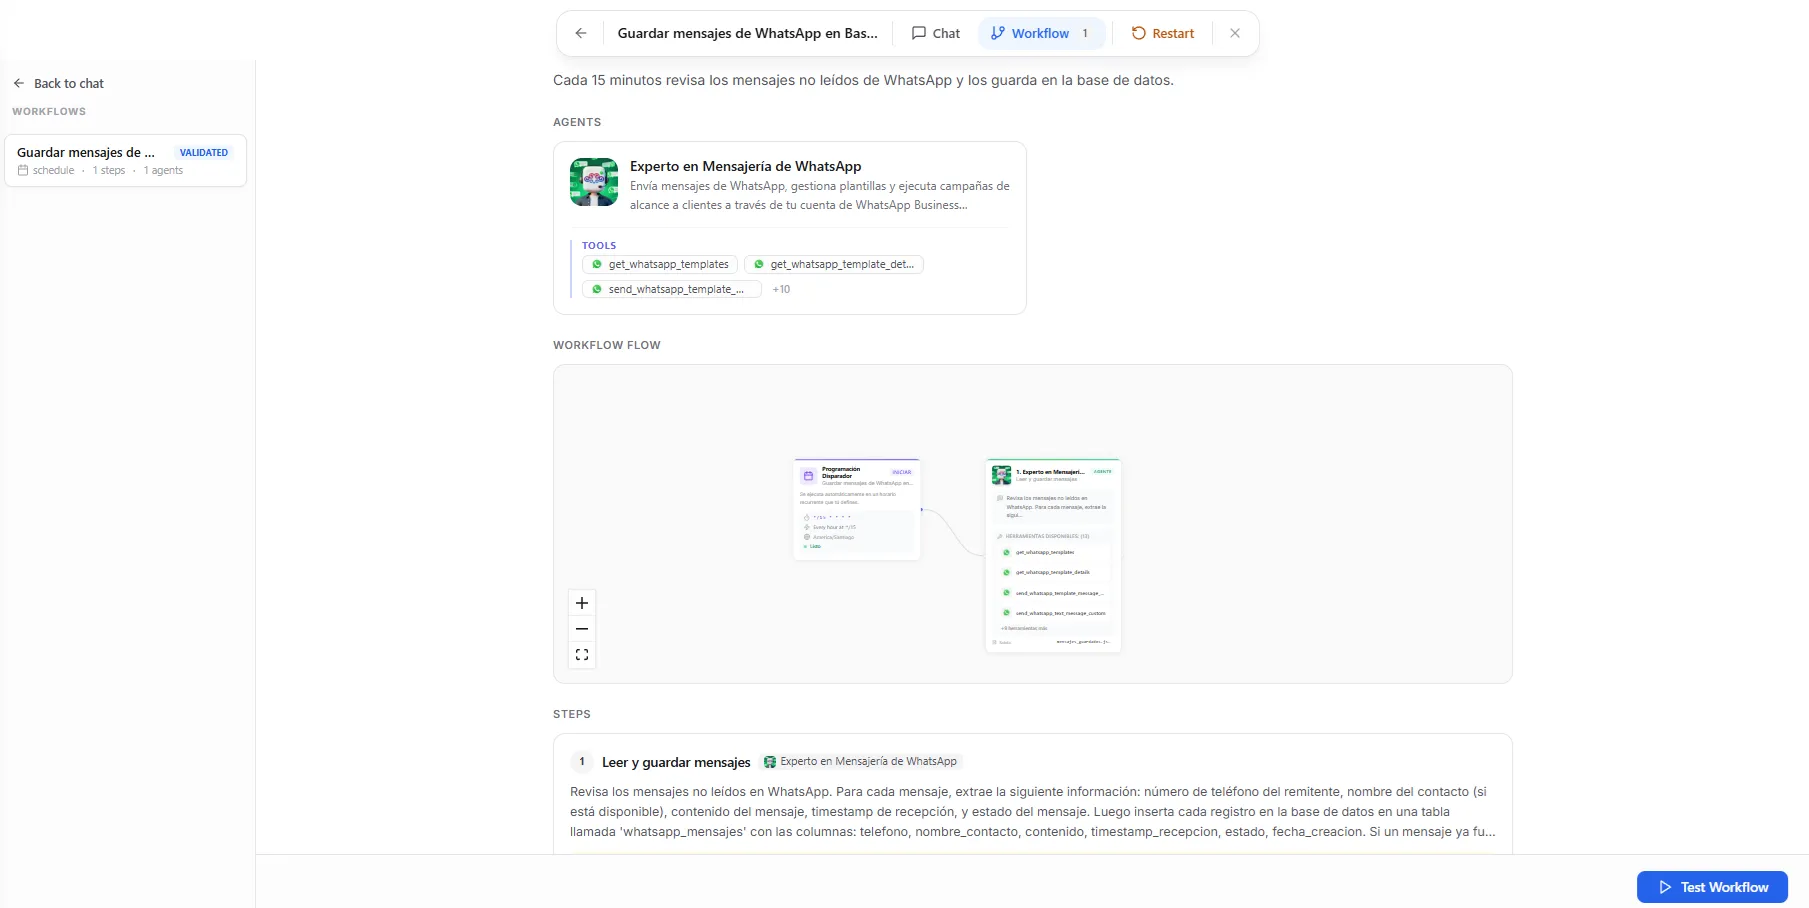 Image: The setup page showing the package sidebar, header, agent cards, flow graph, and step summary
Execution modes
The AI chooses an execution mode (how deeply each agent works through its task) based on how complex your automation is.
| Mode | Speed | Depth | Best for |
|---|---|---|---|
| Agile | Faster | Standard analysis | Simple automations, time-sensitive tasks, frequent runs |
| Intensive | Slower | Deeper, more thorough | Complex research, detailed reports, high-stakes decisions |
You can see which mode was chosen in the setup page header, shown as a badge next to how the automation starts. The AI picks the mode automatically, but it's shown so you know what to expect.
Testing your automation
From the setup page, click "Test Workflow" to run the whole automation with sample data. Nirvai runs every step and shows you the results as they happen.
What you see during a test
Each step displays:
- The agent's profile image and step name
- A status icon (in progress, success, or failure)
- Tool count — how many tools the agent used
- Error count — how many errors came up (if any)
- Duration — how long the step took
- A result summary explaining what the agent did
- Output files shown as small pills you can click to view
After every step finishes, a colored banner appears at the top:
- Green — the test passed
- Red — one or more steps failed
Activating
After a successful test, a floating "Activate" button appears in the bottom-right corner of the setup page. Click it to make your automation live.
What happens next depends on how your automation starts:
| Starts with | What happens on activation |
|---|---|
| Schedule | The automation starts running at the times you set |
| Webhook | The webhook URL begins accepting incoming data |
| Manual | A "Run" button appears on the automation card in the Automations page |
Handling failures
If a test fails, you don't need to start over. AI Setup has a built-in feedback loop.
- A red banner appears showing why it failed.
- The step cards highlight which step failed and show the error details.
- A feedback box appears at the bottom of the page — describe what went wrong or what you want to change.
- The AI rebuilds the workflow based on your feedback.
- Click "Test Workflow" again to re-test after the rebuild.
It often takes two to three rounds to get an automation right, especially for complex multi-step processes. The feedback loop is built for this — refine rather than restart.
Managing your sessions
Resuming a session
Your sessions are saved automatically. To return to one, go to the Automations page and open it from the session list.
Multiple workflows
A single session can produce several workflows. Each one appears in the package sidebar on the left side of the setup page. You might ask the AI to build a second variation or a completely different automation within the same conversation.
Returning to a session
When you return to a session with a finished workflow, the setup page checks where things stand:
- If the workflow is active, the page shows a "Workflow is active" banner with options to open the workflow editor or build another.
- If the workflow was deleted somewhere else (for example, from the Workflows page), an amber banner warns you and offers to take you to Workflows or build another.
- If a test was running, the page picks up where it left off and checks for results.
Restarting
Click the restart button in the session to clear the conversation and start fresh. This does not delete automations you already turned on — it only clears the current design session.
Troubleshooting
| Problem | Fix |
|---|---|
| The AI asks me to clarify or builds the wrong thing | Your description was likely too vague. Be specific about when it starts, the steps in between, and the result. See the prompt examples above. |
| The AI didn't pick my specialized agent | Mention it by name upfront ("Use my Research Agent for the data step"), or add it yourself in the Change Agents panel. |
| My test failed | Read the red banner and the highlighted step for the error, then describe the fix in the feedback box and re-test. No need to start over. |
| I can't find a session I started earlier | Sessions are saved automatically. Go to the Automations page and open it from the session list. |
| An amber banner says my workflow was deleted | The workflow was removed from the Workflows page. Use the banner to go to Workflows or build another in the same session. |
What's next
After your automation passes its test and you activate it, continue to Testing and Runs to watch it work and review past runs.