Manual Builder
Building an automation by hand is like assembling something with building blocks instead of describing what you want and letting someone build it for you -- you pick each piece, place it exactly where you want, and connect everything together yourself. The Manual Builder gives you that level of control over every detail.
It works in two phases:
- Creation Wizard -- a step-by-step setup that handles the basics (name, what starts the automation, and which agents to include)
- Visual Editor -- a drag-and-drop workspace where you add, connect, and configure the pieces that make up your automation
Throughout this page, each of those pieces is called a node (a single block on the workspace -- a starting point, a task, or a decision).
Manual Builder
Build automations step by step with full control over every node, connection, and configuration
- Step-by-step creation wizard
- Visual drag-and-drop editor
- Precise control over agents, steps, and routing
- Fine-tune automations created with AI Setup
Before you start
- An idea of what you want to build -- the Manual Builder works best when you already know the steps and agents you need.
- Your agents ready -- if you want to use a specialized agent (not just the default one), create it first so it shows up in the list.
- A trigger in mind -- decide what should start your automation: a set schedule, an alert from another app, or a button you press. See Choosing a Trigger if you're not sure.
When to use the Manual Builder
- You know exactly what steps and agents you need
- You want a simple 2-3 step automation
- You need to fine-tune an automation that was first created with AI Setup
- You prefer hands-on control over every detail
The Creation Wizard
The creation wizard walks you through three steps to set up the foundation of your automation before you start building in the visual editor.
Step 1 -- Name and trigger
Give your automation a name and a short description so you can find it later. Then choose the trigger -- the event that starts your automation running.
| Trigger Type | When It Runs |
|---|---|
| Schedule | At set times on a repeating basis -- daily, weekly, or hourly |
| Webhook | When another app sends information to a private web address that belongs to your automation |
| Manual | When you click the Run button yourself |
For a full breakdown of each trigger type, see Choosing a Trigger.
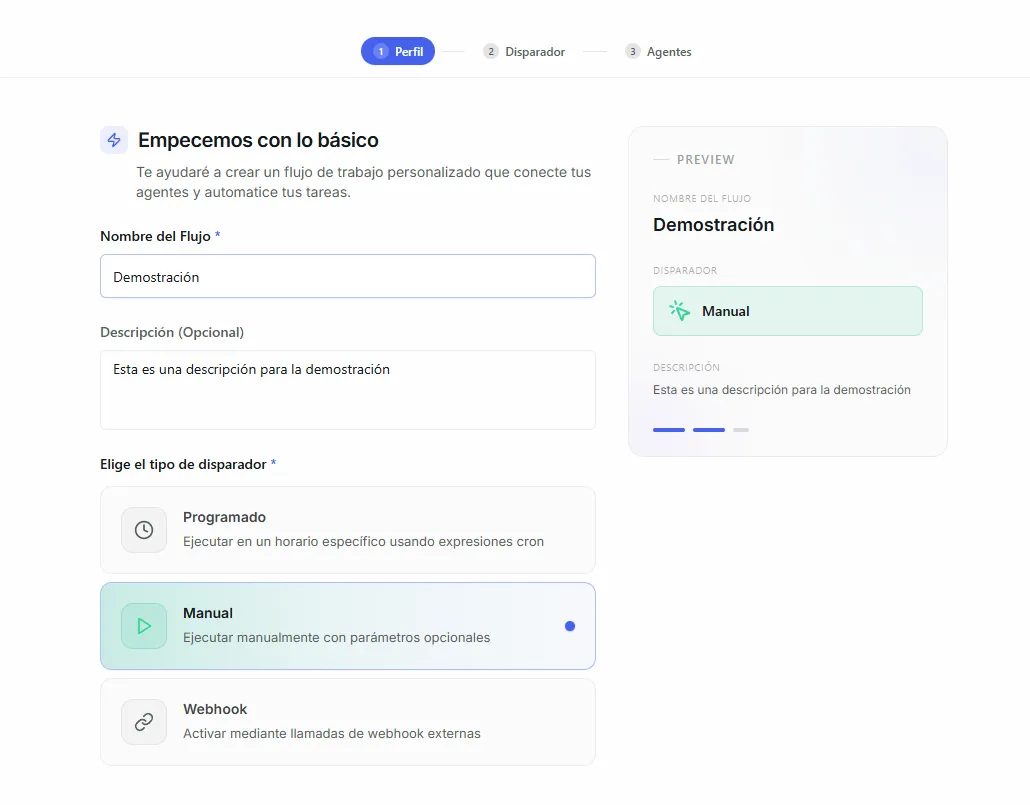 Image: Wizard step 1 showing the name, description, and trigger type selection fields
Step 2 -- Configure the trigger
The setup options change depending on the trigger you chose:
Schedule trigger:
- Pick which days the automation should run
- Set the time and how often (every hour, once a day, and so on)
- Review the next 5 upcoming runs to confirm the schedule looks right
Webhook trigger:
A webhook is the automatic alert another app sends Nirvai the moment something happens on its side.
- Copy your unique web address -- this is where the other app will send its information
- Copy your private key -- a password the other app must include (as a setting called
X-FLOW-API-KEY) so Nirvai knows the request is really from you
Manual trigger:
- No extra setup needed. You'll start the automation yourself from the Automations page.
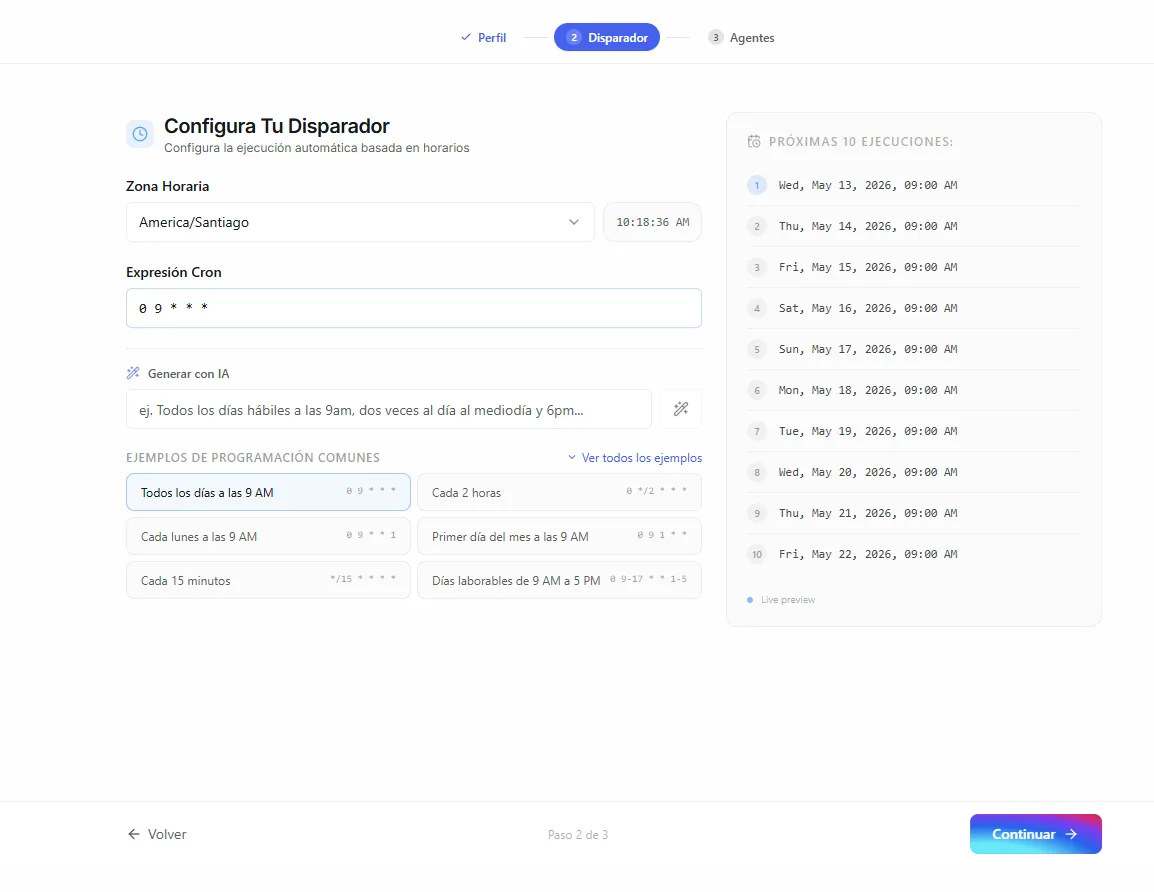 Image: Wizard step 2 showing trigger configuration options for a schedule trigger
Step 3 -- Select agents
Choose which AI agents will be available inside this automation:
- Default Nirvai Agent -- always available, general-purpose, good for most tasks
- Your custom agents -- specialized agents you've created with their own knowledge, tools, and instructions
You can select more than one agent. Each one will be available to assign to individual steps once you move to the visual editor.
 Image: Wizard step 3 showing the agent selection panel with available agents
You're choosing which agents are available in this automation, not assigning them to specific steps yet. You'll assign agents to individual steps in the visual editor.
The Visual Editor
After finishing the wizard, you land in the visual editor -- a workspace where you build your automation by adding nodes and connecting them together.
The workspace starts with your trigger node already placed. From there, you add agent steps and routers, drag connections between them, and set up each node.
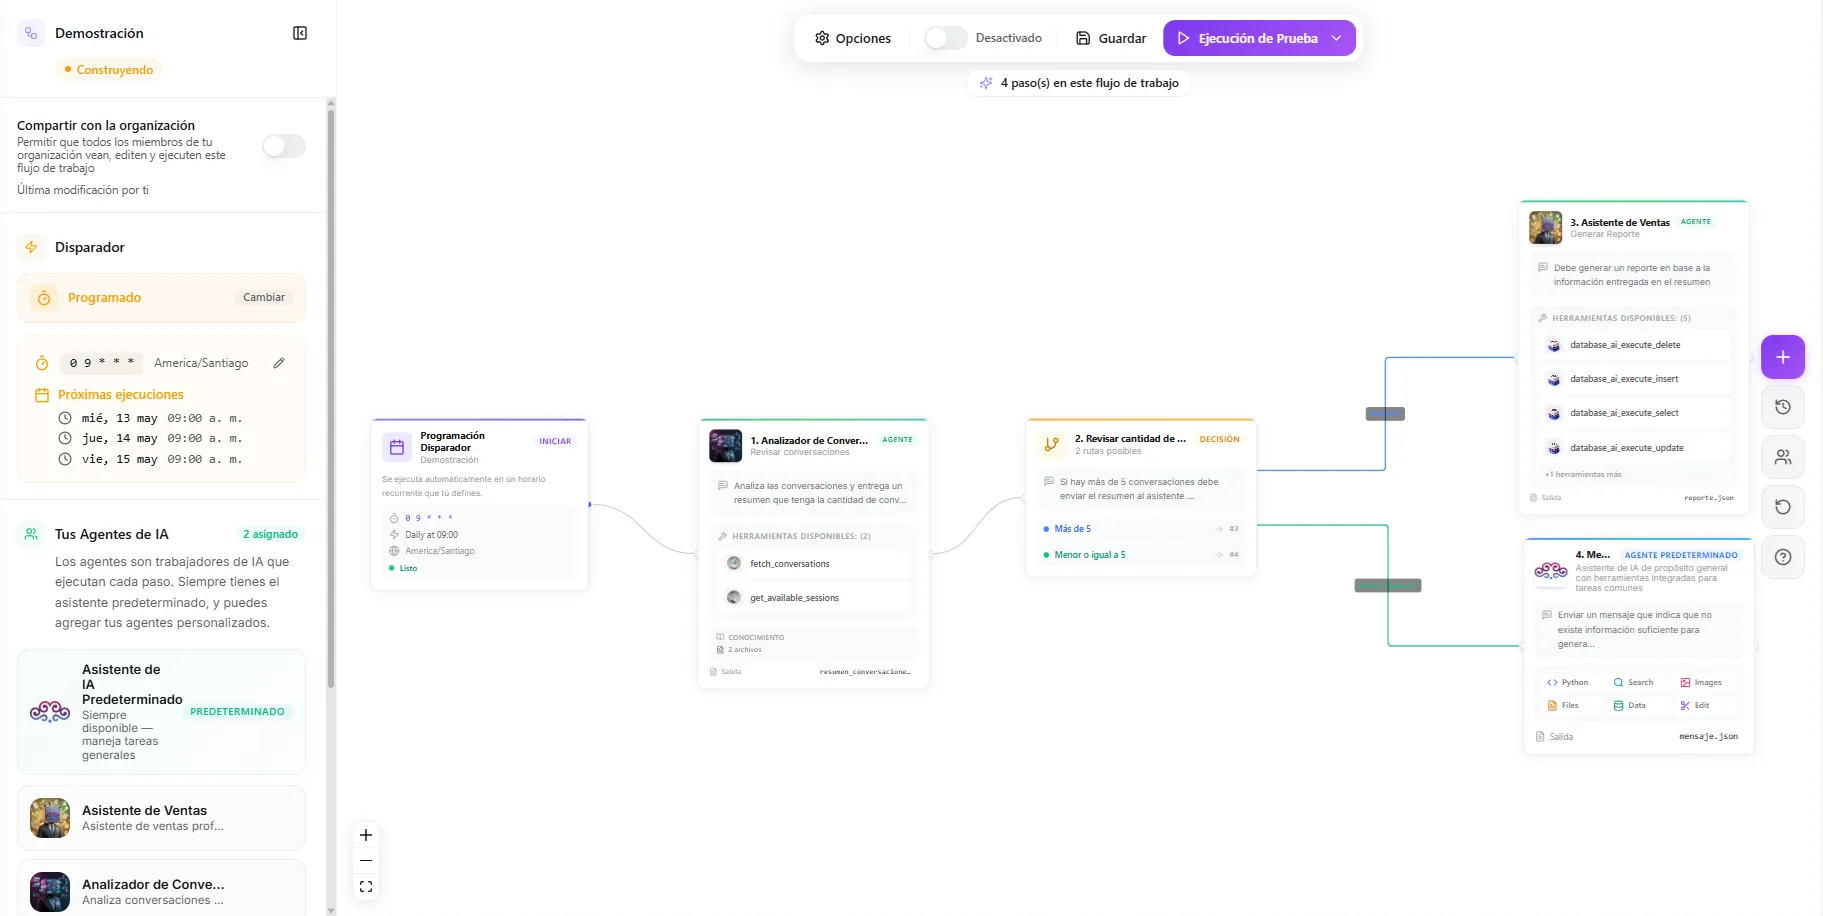 Image: The visual editor canvas showing a trigger node connected to agent steps and a router
What you can do
| Action | How |
|---|---|
| Add an agent step | Click the add button and select "Agent Step" |
| Add a router | Click the add button and select "Router" |
| Connect nodes | Drag from one node's output point to another node's input point |
| Set up a step | Click a node to open its settings panel |
| Rearrange nodes | Drag nodes to move them around the workspace |
| Delete a step | Select a node and press delete, or use the right-click menu |
How nodes connect
Information flows from left to right (or top to bottom). Each node receives the result of the previous node as its starting material. A router is a fork in the road -- it splits the flow into different paths based on conditions you define.
Configuring agent steps
When you click an agent step on the workspace, a settings panel opens. Here you set up three things:
- Which agent performs this step -- pick from the agents you chose during the wizard
- Instructions -- tell the agent exactly what to do with the information it receives
- Where to save the result -- the agent saves its work to a file, and that file becomes the starting material for the next step
You can also set up what happens on success or failure -- whether the automation continues to the next step, jumps to a different step, tries again, or stops.
For full details on writing effective instructions and setting up agent steps, see Agent Steps and Routers.
Configuring routers
Routers add decision points to your automation. When you click a router on the workspace, you set up:
- A question to evaluate -- something to judge based on the previous step's result (for example, "Is the sentiment positive, negative, or neutral?")
- Conditions -- each possible answer and which step it leads to
Each condition creates its own path on the workspace, so your automation can handle different situations differently.
For full details on setting up conditions and routing logic, see Agent Steps and Routers.
Saving, testing, and activating
Once you've built your automation, three actions are available from the editor toolbar:
1. Save
Click Save to keep your changes. Your automation stays as a draft until you turn it on.
2. Test
Click Test to run the automation with sample information. This opens the Live View, where you can watch each step run in real time, see what each agent produced, and catch any problems before going live.
3. Activate
Flip the Activate switch to make your automation live. Once active:
- Schedule triggers run at their set times
- Webhook triggers respond to information sent by other apps
- Manual triggers show the Run button on the Automations page
For more details on testing and watching runs, see Testing and Runs.
You can switch between the Manual Builder and AI Setup at any time. A common approach is to start with AI Setup to generate a draft automation, then switch to the Manual Builder to fine-tune specific steps, instructions, or routing.
Manual Builder vs AI Setup
| Scenario | Recommended |
|---|---|
| You know exactly what steps and agents you need | Manual Builder |
| You want the fastest way to build a complex automation | AI Setup |
| You need to fine-tune an existing automation | Manual Builder |
| You're not sure which agents or steps to use | AI Setup |
| Simple 2-3 step automation | Manual Builder |
| Complex multi-agent process with branching | AI Setup |
| You want to learn how automations work by building one piece at a time | Manual Builder |
There's no wrong choice -- both approaches produce the same result. Many people start with AI Setup for the initial design, then switch to the Manual Builder to adjust the details. Use whichever feels more natural for the task at hand.
Troubleshooting
| Problem | Fix |
|---|---|
| You don't see your custom agent in Step 3 | Make sure the agent is created and saved before opening the wizard. Only agents you've already made appear in the list. |
| You can't connect two nodes | Drag from the output point on the right of one node to the input point on the left of the next. A node also needs a path leading into it before it can run. |
| The next step doesn't get the previous step's result | Check that the two steps are connected, and that your instructions tell the agent to use the incoming information. |
| Your changes disappeared | Click Save before leaving the editor -- automations stay as drafts until saved, and aren't live until activated. |
| The automation won't run after you built it | Flip the Activate switch on. A saved draft doesn't run until it's active. |
What's next
Continue to Agent Steps and Routers to learn how to write strong instructions and set up decision points, then Testing and Runs to test, activate, and watch your automation in action.