Testing & Monitoring Runs
Testing an automation is like a dress rehearsal before opening night -- you run through everything once, in a safe setting, to catch problems before the real audience shows up. Before turning on an automation, always test it. Nirvai gives you one smooth flow: test first, review the results step by step, then activate -- all from one page.
Testing from AI Setup
When you build an automation with AI Setup, testing happens right on the setup page — no need to switch screens.
- Click "Test Workflow" at the bottom of the setup page
- Nirvai finalizes your automation and runs it from start to finish
- Results appear in real time on the same page
Step-by-step results
Each step in your automation shows up as a card that tells you exactly what happened:
- Agent identity — the agent's profile picture alongside the step name and agent name
- Status icon — a checkmark for success, an error icon for failure, or a spinner while it's still working
- Quick facts — how many tools were used, how many errors occurred, and how long the step took, at a glance
- Result summary — a short description of what the agent did, or why it failed
- Output files — any files the step produced appear as small clickable tags you can open to preview
Trigger steps are hidden — you only see the agent steps that did actual work. A colored banner appears at the top of the results: green for success, red for failure.
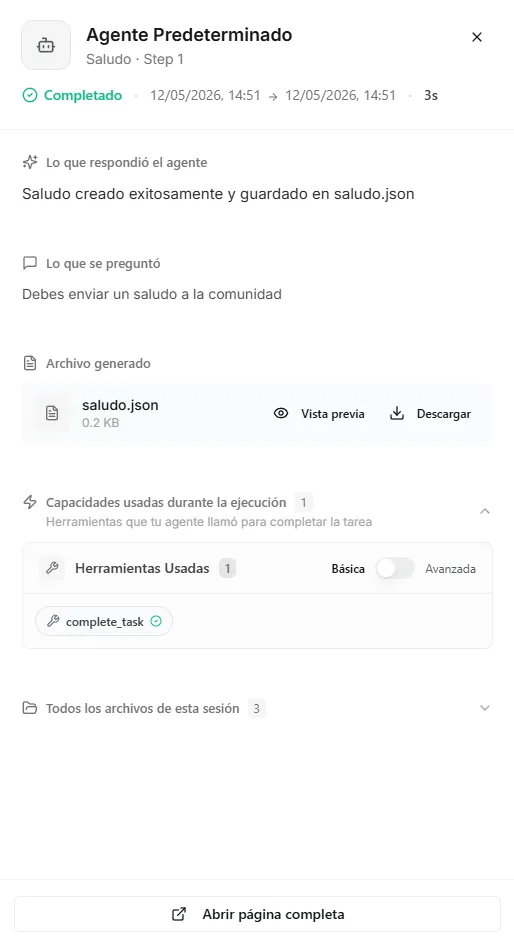 Image: Test results showing agent step cards with status, metadata, and output summaries
Testing from the Manual Editor
When you build an automation by hand in the visual editor:
- Open your automation in the visual editor
- Click "Test" in the toolbar
- For webhook automations (ones started by another app sending information), you can provide sample information that stands in for what the other app would normally send
- The automation runs and you enter the Live View
The Live View
During any run — whether a test or a live run — the Live View shows a visual replay of your automation running step by step.
- Nodes (the individual blocks on the workspace) light up as each step runs
- Click any step to see what it received, what it produced, and how long it took
| Color | Meaning |
|---|---|
| Blue | Currently running |
| Green | Finished successfully |
| Red | Failed |
| Gray | Not yet reached |
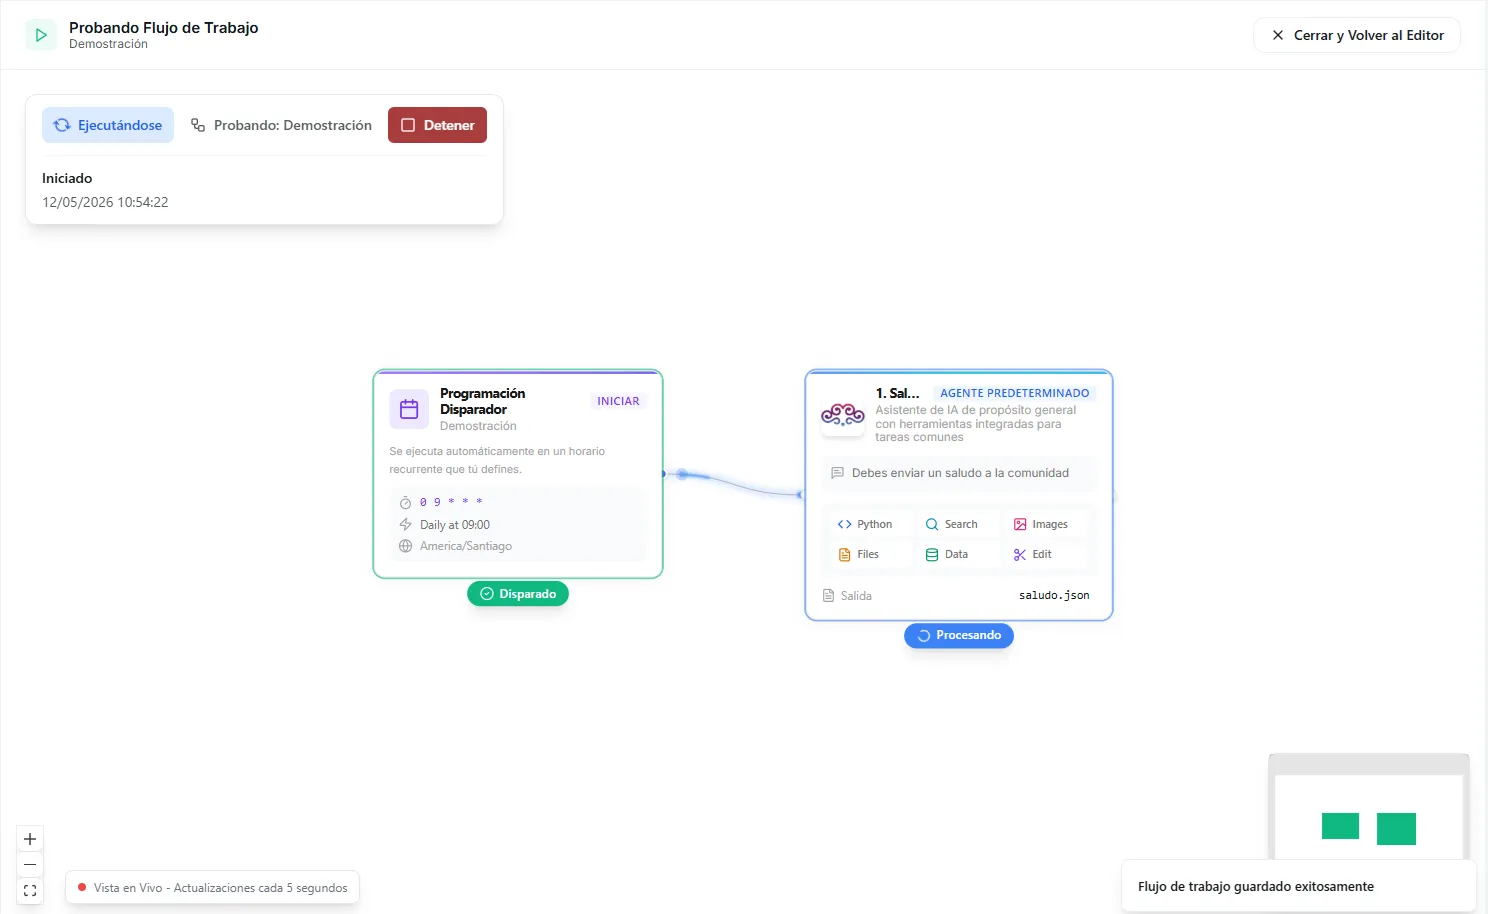 Image: The Live View showing nodes lighting up in sequence as each step executes
The Test-Activate Flow
After you test from AI Setup, the page moves through a series of stages. Here's what to expect at each one:
| Stage | What You See | What to Do |
|---|---|---|
| Pre-test | Setup page with your automation's details | Click "Test Workflow" |
| Testing | Blue banner "Running test...", live step results appearing | Wait for it to finish |
| Test Passed | Green banner, step results, action cards | Click the floating "Activate" button |
| Test Failed | Red banner, failed step highlighted, feedback box | Send feedback or click "Re-test" |
| Activating | Spinner "Activating..." | Wait |
| Activated | Green "Workflow is active" banner | Done — go to Workflows or build another |
| Deleted | Amber "Workflow was deleted" banner | Go to Workflows or build another |
Handling Test Failures
When a test fails:
- A red banner shows the overall reason it failed
- The failing step is highlighted with an error icon and a message explaining what went wrong
- You have three ways to move forward:
| Option | How It Works |
|---|---|
| Send feedback | Type what went wrong in the feedback box — the AI rebuilds the automation based on your guidance |
| Re-test | Click "Re-test" to try again without making changes |
| Open in editor | Switch to the manual editor to fix specific steps yourself |
It often takes 2-3 rounds to get an automation right. The feedback loop makes refining quick — describe what was wrong, let the AI adjust, and test again.
After a Successful Test
When all steps pass, action cards appear below the results:
- View full run details — opens the run record in a new tab so you can inspect every input and output
- Open in editor — switch to the manual editor for fine-tuning before going live
- Re-test workflow — run the test again to check it behaves the same way each time
The floating "Activate" button appears in the bottom-right corner with a blue glow, ready for you to go live.
Activating Your Automation
Click "Activate" to go live. What happens next depends on your trigger — the event that starts your automation:
| Trigger | What Happens on Activation |
|---|---|
| Schedule | The automation starts running at the times you set (for example, every day at 9 AM) |
| Webhook | The automation's private web address starts accepting information from other apps and processing it |
| Manual | A "Run" button appears on the automation card — click it anytime to run |
Deactivating
Flip the Activate switch off to pause your automation. It stops running, but all your setup is kept. Turn it back on anytime.
Pausing a scheduled automation cancels its upcoming runs. Pausing a webhook automation stops it from processing information from other apps, but its web address stays the same — so you can turn it back on without changing anything in the other app.
Execution Modes
The AI automatically picks an execution mode based on how complex your automation is:
| Mode | Speed | Depth | Best For |
|---|---|---|---|
| Agile | Faster | Standard analysis | Simple automations, time-sensitive tasks, frequent runs |
| Intensive | Slower | Deeper, more thorough | Complex research, detailed reports, high-stakes decisions |
Intensive mode is available on PRO plans. It gives agents more time to work through complex tasks that need deeper analysis.
Monitoring Runs
Every time an automation runs — from a test, a schedule, a webhook, or a manual trigger — it creates a run record in your history: a saved log of that single run, with everything that happened.
Viewing run history
- Go to the Automations page
- Switch to the Runs tab
- See all the runs with their status, time, and how long each took
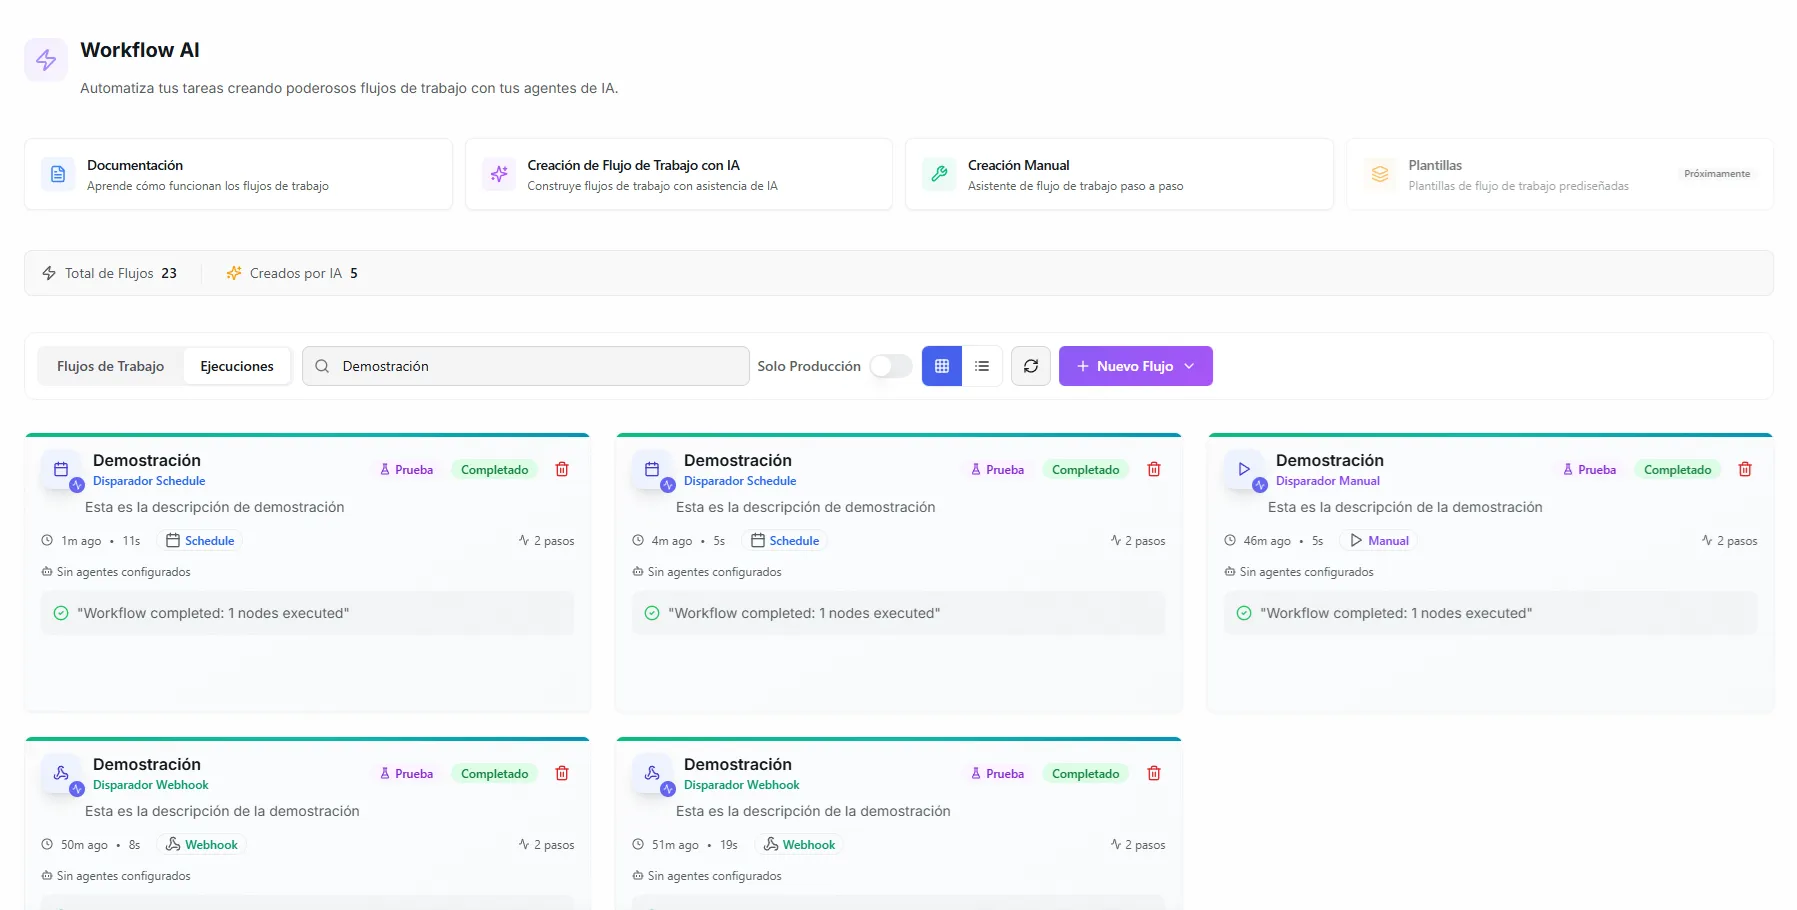 Image: The Runs tab showing a list of executions with status, duration, and timestamps
Run statuses
| Status | Meaning |
|---|---|
| Running | At least one step is in progress |
| Completed | All steps finished successfully |
| Failed | One or more steps hit an error |
| Stopped | A user stopped it by hand before it finished |
Inspecting a run
Click any run to open the Live View with full details — which steps ran, what each agent received and produced, how long each step took, and where any errors happened.
Stopping a run in progress
If an automation is running and you need to stop it:
- Find the run in the Runs tab (it shows "Running" status)
- Click into the run to open the Live View
- Click the Stop button
The automation halts at the current step. Steps that already finished keep their results.
Automation Statuses
Your automations can have the following statuses:
| Status | Meaning |
|---|---|
| Draft | Created but not fully set up |
| In Creation | Being built |
| Active | Live and running on its trigger |
| Inactive | Paused — won't run until turned back on |
| Testing | Currently running a test |
Plan Limits
| Plan | Max Agents per Automation |
|---|---|
| Basic | 3 |
| PRO | 10 |
Troubleshooting
| Problem | Fix |
|---|---|
| Automation doesn't run on schedule | Check that it's activated. Confirm the schedule settings (days, time, time zone). |
| An agent step fails | Review the agent's instructions — make them more specific. Check that the agent has the right tools turned on. |
| Router sends the flow down the wrong path | Make the conditions more specific and non-overlapping. Check the previous step's result to see what the router is judging. |
| Webhook isn't receiving information | Confirm the web address is pasted correctly in the other app. Make sure the X-FLOW-API-KEY setting (your private key) is included. |
| Results are poor quality | Switch to Intensive mode. Improve the agent's instructions. Use a specialized custom agent instead of the default. |
| A step takes too long | Simplify the instructions. Break the step into two smaller steps. Switch to Agile mode if deep analysis isn't needed. |
| Test passes but the real run fails | Check that your sample test information matches real-world input. Confirm any connected accounts and tools are still working. |
What's next
You've now built, tested, and activated an automation. To share it with your team or reuse it elsewhere, continue to Sharing Automations.