Agent Tasks
Agent Tasks turn each row in your database into a task for an AI agent. You pick an agent, write what it should do with the record, choose when to run it, and the agent reads the row, follows your instruction, and writes results back — updating the status, filling in fields, generating content into the page body, or even updating another record to trigger the next agent in line.
Use it to automate the repetitive things you'd normally do row by row: summarize incoming leads, qualify deals, draft outreach replies, score applications, follow up on stale conversations, generate content from briefs — anything you'd do once and then wish you could do for every record automatically.
How an agent task works
Every record in an agent-task-enabled table gets a small Agent Task card in its detail drawer with four settings:
| Setting | What it controls |
|---|---|
| Agent | Which AI agent will work on this record. Only agents connected to this database show up. |
| Task | The instruction in plain language — "Summarize this lead", "Draft a follow-up email", "Update status to Done when the brief is filled in". |
| Execute | When the task runs — immediately, on a schedule, or when a status column changes. |
| Status | Where the task currently is — pending, queued, running, completed, failed, or timed out. |
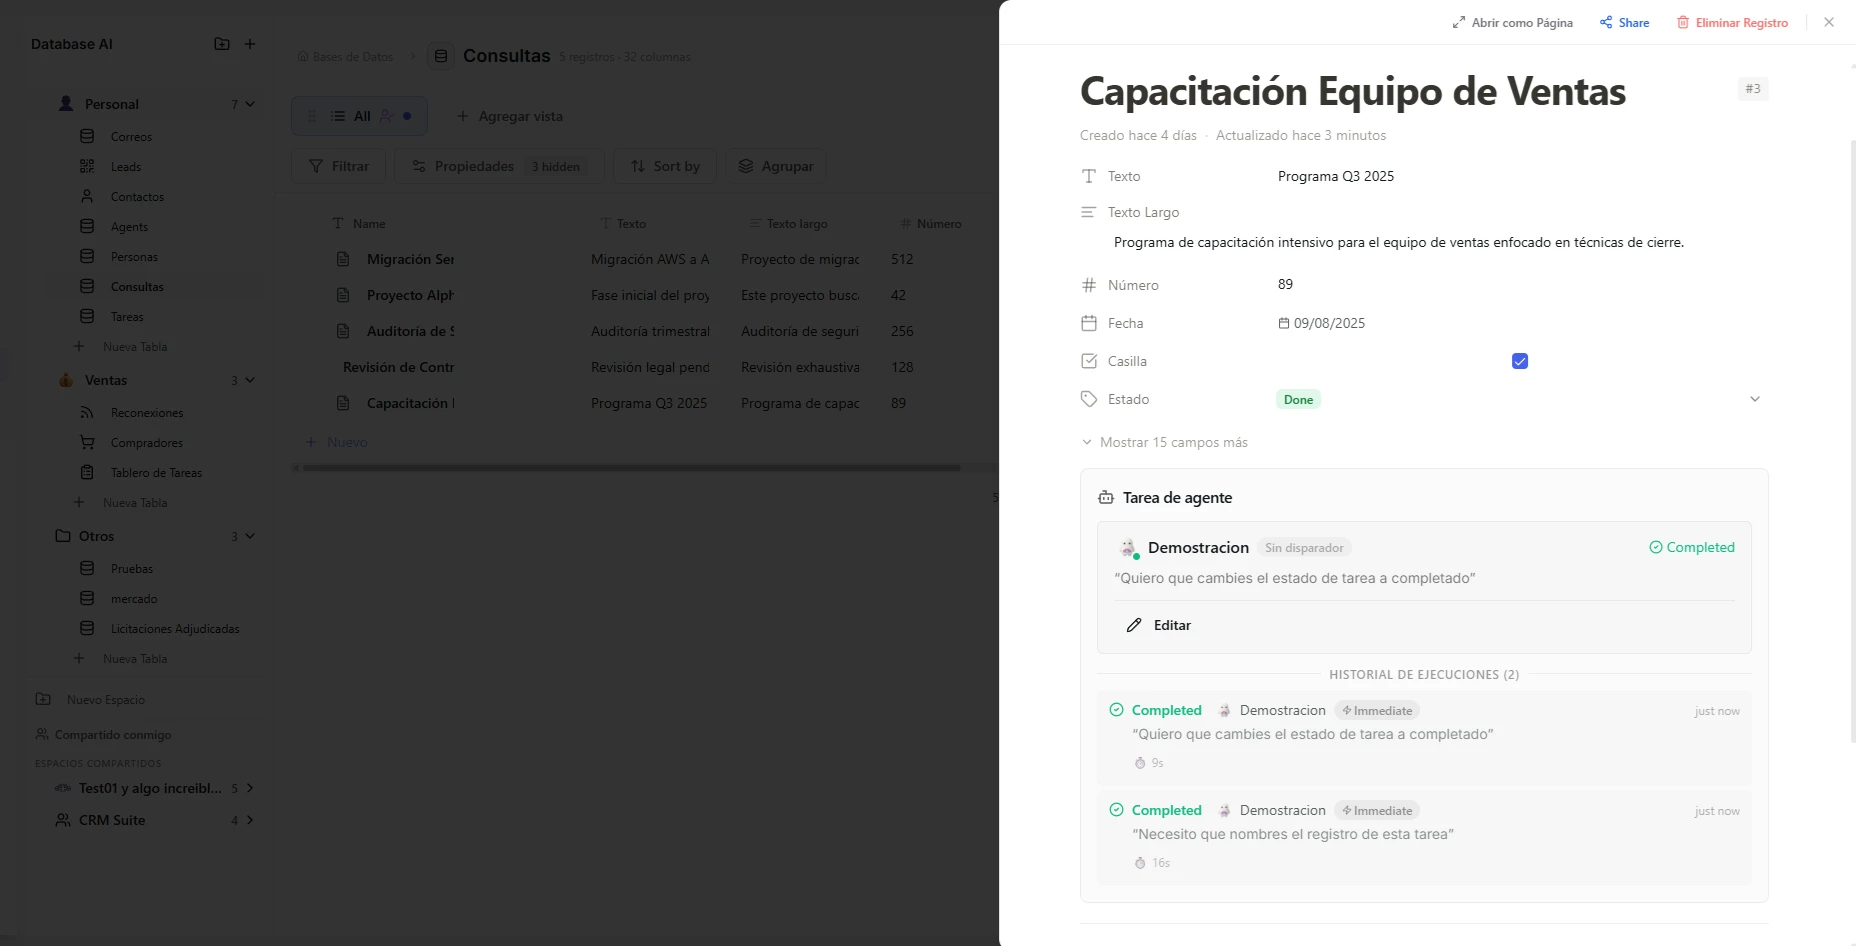 Image: Agent task section in the record drawer with execution history
When the task runs, the agent receives the full record context (every field's value), follows your instruction, and can use any database tool it has access to — reading other records, updating fields, writing markdown into the page body, or assigning new tasks to other records.
Before you start
Three things need to be in place before an agent can work a record:
- A saved agent. Any agent works — there's no special "task" agent type. If you don't have one yet, build one in the Agent Control Panel.
- The agent connected to this database. You add the connection in the agent's Databases section and grant it a permission level:
- Read — the agent can look at records but can't change anything.
- Write — the agent can update fields and write into the page body. This is the level most tasks need.
- Full — everything write can do, plus deleting records.
- Agent Tasks switched on for the table (see Turning Agent Tasks on or off just below).
With all three in place, the agent appears in the picker on every record in that database.
Turning Agent Tasks on or off
Agent Tasks is opt-in per table, and you control it from the same place you build the table — the Create Database or Edit Database page.
To turn it on:
- Open the table's Create Database page (while making a new table) or Edit Database page (for an existing one). You can also use the table's Settings → Agent Tasks.
- Find the Agent Tasks card in the Special fields section.
- Click Turn on.
When you turn it on, five hidden fields are added to every row. You don't see most of them in the views — they live in the Agent Task card inside the record drawer. The fields are:
| Field | Visible in views | What it does |
|---|---|---|
| Agent | Yes (as avatar) | The agent assigned to this record |
| Task | No | The instruction text |
| Execute | No | When and how the task should run |
| Status | No | Current execution state |
| Session | No | Internal link to the agent's reasoning log |
The agent avatar shows up as a small circle on each row in List, Grid, Kanban, and Calendar views — same place a Person column would render. The other fields only appear inside the record drawer.
To turn it off, go back to the same Agent Tasks card on the Edit Database page (or Settings → Agent Tasks) and click Disable. A confirmation appears first, because turning it off:
- Cancels any tasks still pending or queued
- Removes the Agent Task fields and the per-table settings
Your records and their other data are untouched — only the agent-task setup is removed, and you can turn it back on whenever you want.
Picking an agent
Only agents that have been connected to your database appear in the agent picker. Connections happen in the Agent Control Panel — you add the database to the agent's "Databases" section and grant it read, write, or full permissions.
If you don't see an agent you expect, double-check that:
- The agent is connected to this specific database (not just to your account)
- The agent's permissions include at least read access — write or full are required if you want it to update records
Set up a task on a record
Once Agent Tasks is on and an agent is connected, every record's detail drawer has an Agent Task card. To assign a task:
- Open the record (click the row) to slide out its detail drawer.
- Scroll to the Agent Task card.
- Agent — pick the agent from the dropdown. Only agents connected to this database appear.
- Task — type the instruction in plain language: what to read, what to do, and where to put the result.
- Execute — choose when it runs (see Execution modes below). Picking Execute now starts it right away.
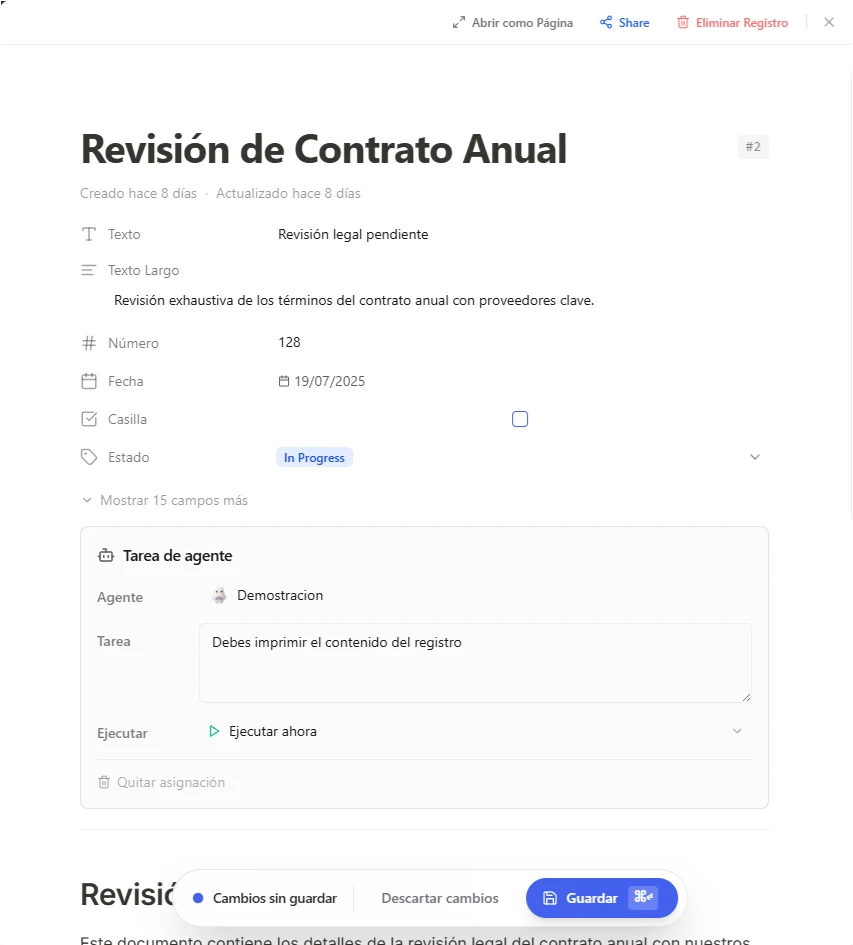 Image: A record's Agent Task card with an agent picked, an instruction written, and Execute set to run now
The Agent and Task fields save on their own the moment you change them — you don't need to press the record's Save button for those. Choosing an Execute option is what actually starts (or schedules) the run.
Writing a good task instruction
The instruction is the most important part. The agent reads the full record context plus your instruction, so be concrete about:
- What to look at — "Read the email, name and notes fields"
- What to do — "Write a 3-sentence summary of this lead"
- Where to write the result — "Save the summary in the description (page body) and mark Status as Reviewed"
Good examples:
Read the lead's name, company, and the notes column. Write a friendly outreach email in the page body and update Status to "Ready to send" when finished.
Look at the contact's industry and revenue range. Score from 1–5 in the Lead Score field. If score ≥ 4, set Status to "Hot lead".
Translate the Description field from English to Spanish and save the result in the Translated Description field.
Tip: Reference fields by their column name — agents read the column names from the table structure.
Execution modes
The Execute dropdown is where you choose when the agent runs. It groups the options into three sections:
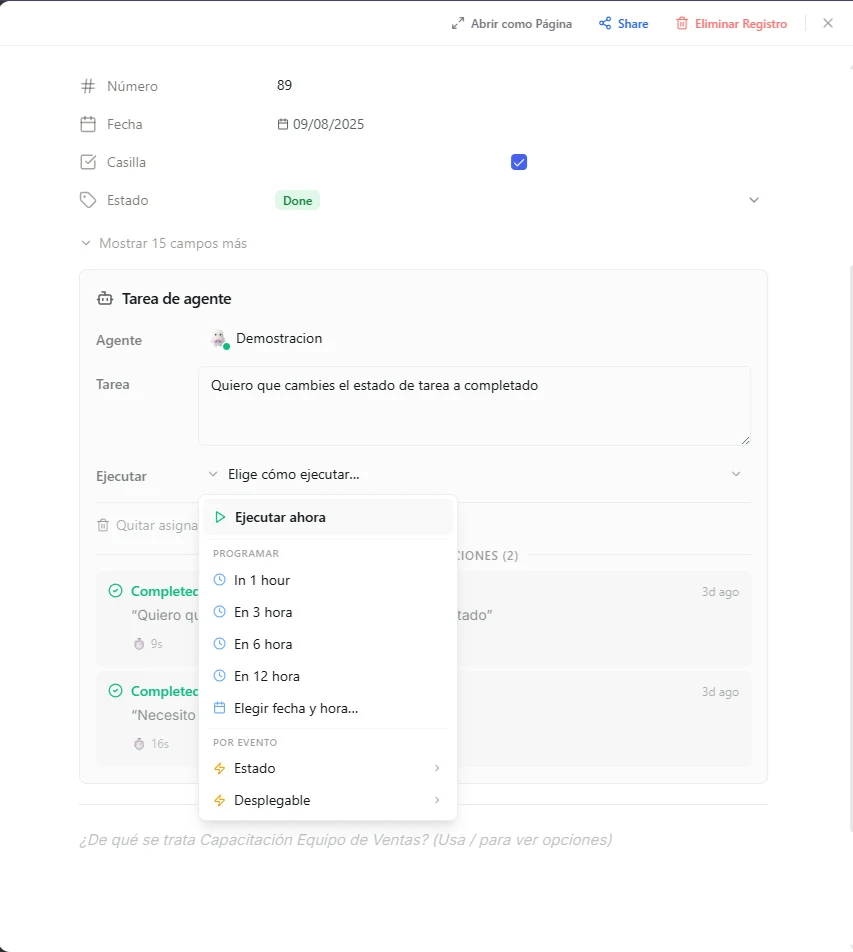 Image: The Execute dropdown open, showing Execute now, the schedule options, and the by-event triggers
Run now
| Mode | Description |
|---|---|
| Execute now | Runs immediately. The status flips to queued, then running, then completed (or failed). |
Schedule — the task waits, then runs once at a future time. Status sits at pending until then.
| Mode | Description |
|---|---|
| In 1 / 3 / 6 / 12 hours | Runs that many hours from now — one click, no date picker. |
| Pick date & time | Choose any specific date and time. |
By event — the task runs when a column in this same record changes to a value you choose. The menu lists every Status and Select (dropdown) column on the table, so you can trigger on whichever one drives your pipeline. Setting one up is a two-step pick:
- Choose the trigger column — a Status or Select column (e.g. "Status", "Stage").
- Choose the value that fires it — e.g. "Qualified". The task stays
pendinguntil the column hits that exact value, then the agent runs.
Event triggers are the cleanest way to build pipelines: "when this lead's Status moves to Qualified, draft a proposal email." The agent waits on its own — you never have to remember to press Run — and because a human or another agent can move that status, it doubles as the link in an agent chain.
Credits
Every task run uses credits, the same way a chat with that agent would — the work is billed to the assigned agent. A quick summary on a short record costs very little; a task that reads long fields, searches the web, or reasons across several steps costs more.
Scheduled and event-driven tasks only spend credits when they actually run, not while they sit at pending. A task that never meets its trigger never costs anything.
Status and what each state means
| Status | What it means |
|---|---|
| (blank) | No task scheduled |
pending | Task is registered but waiting (scheduled time, or event hasn't fired yet) |
queued | Task is about to start — waiting for a concurrency slot |
running | Agent is actively working on this record |
completed | Agent finished successfully |
failed | Agent hit an error — see execution log for details |
timeout | Agent ran longer than the table's max execution time |
cancelled | You manually cancelled the task |
You can Cancel a pending or queued task at any time. Failed and timeout tasks have a Retry button — same agent, same instruction, fresh run.
Viewing the execution log
Every run produces a complete log of the agent's reasoning — what context it received, how it thought about your instruction, what tools it called, and what the final answer was.
To open the log, click View execution on a completed (or failed) task. A read-only dialog opens showing the full session:
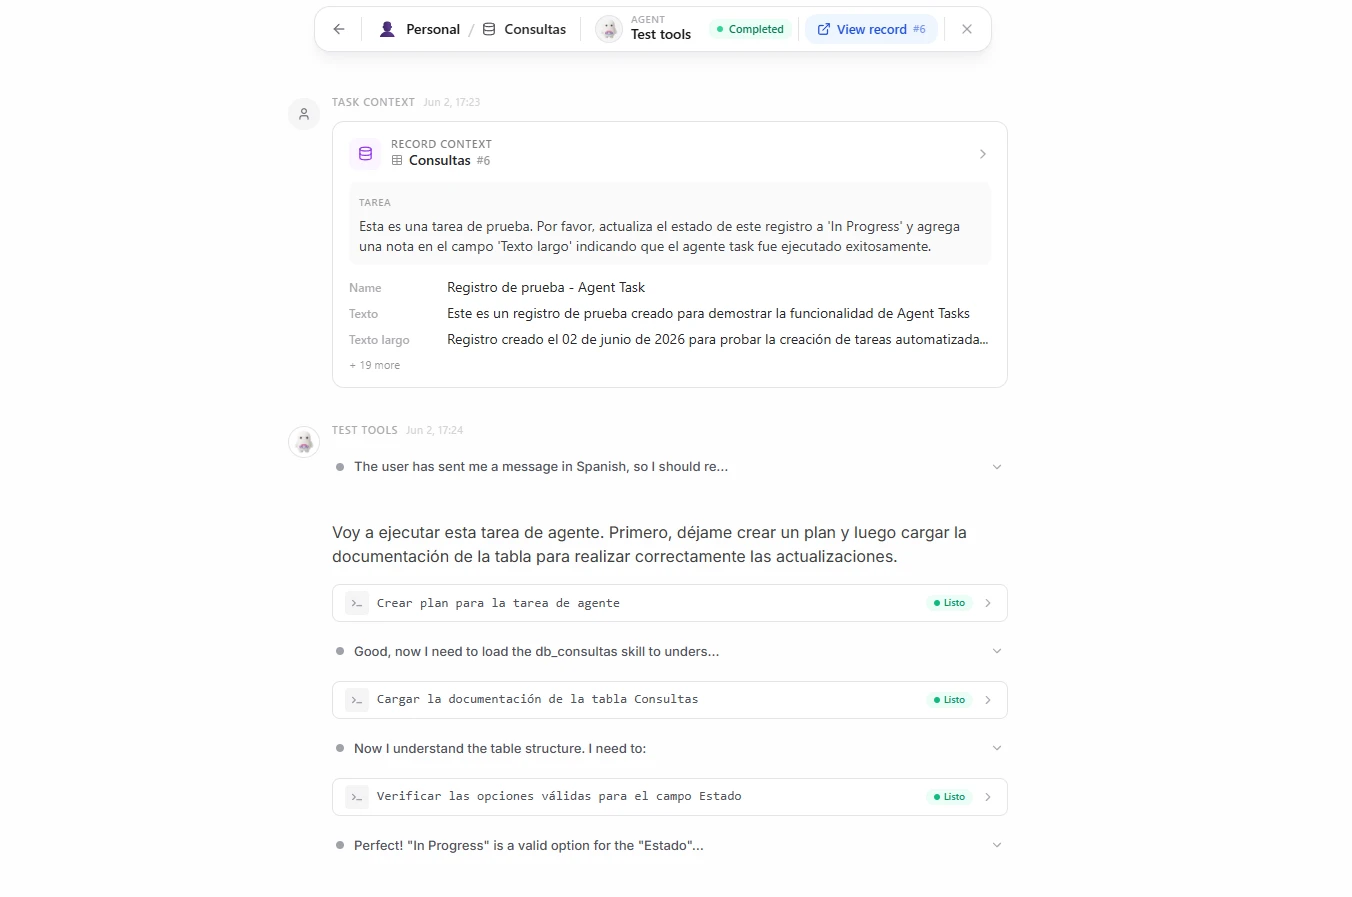 Image: Agent execution log dialog showing the task context and the agent's reasoning
The log starts with the record context the agent received (as a structured XML block), followed by the agent's step-by-step thought process and any tool calls it made. Use it to:
- Debug an agent that's not behaving the way you want
- See exactly what the agent saw about each record
- Refine your instruction based on the agent's reasoning
- Verify that an agent did what you asked
Agent chains: one agent triggering another
Agents can update other records as part of their work. Combined with event driven execution, this lets you build chains without any workflow builder:
Self-loop protection: An agent updating its own record's status won't re-trigger itself — Nirvai blocks new tasks on rows that are already pending, queued, or running. Cross-record chains are allowed.
Concurrency: Each table has a configurable max number of agents running at once (default 3). Tasks beyond the limit stay in pending until a slot frees up.
Where agents appear in views
Once Agent Tasks is enabled on a table, the agent avatar appears next to each record:
| View | Where the agent shows up |
|---|---|
| Grid / List | Inline as a small avatar + name in the Agent column, with a colored status dot |
| Kanban | Small avatar on each card (no name, just the circle) |
| Calendar | Small avatar on each event |
The status dot color tells you the current state at a glance — blue (pulsing) for running, green for completed, red for failed.
Managing tasks for a specific agent
To see everything an agent has done across all tables, open the Agent Control Panel for that agent and look at the Tasks tab. You get a paginated list of every task the agent has been assigned, with status, duration, instruction preview, and a link to the full execution log.
This is the fastest way to:
- Audit what an agent has been doing
- Find tasks that failed and need a different instruction
- Spot patterns where the agent struggled
Concurrency and timeout limits
Each table has two settings you can adjust when enabling Agent Tasks:
| Setting | Default | What it does |
|---|---|---|
| Max concurrent tasks | 3 | How many records can have an agent actively working at the same time |
| Max execution minutes | 15 | After this long, a running task is marked as timeout |
Set these higher for fast, simple tasks (summaries, translations) and lower for heavy ones (deep research, multi-step reasoning).
Troubleshooting
| Problem | Likely cause and fix |
|---|---|
| The agent I want isn't in the picker | It isn't connected to this database. Add the connection in the Agent Control Panel and give it at least read permission. |
| The task ran but nothing changed in the record | The agent only has read permission. Raise it to write or full so it can update fields and the page body. |
Status is stuck on pending | That's expected for scheduled and event-driven tasks — they wait. A scheduled task runs at its time; an event task runs only when the trigger column hits the exact value you set. |
| The task never reaches the agent | The table is at its max concurrent tasks limit (default 3), so the task stays queued until another finishes. Wait, or raise the limit when enabling Agent Tasks. |
| An event-driven chain didn't start the next agent | The triggering agent needs write or full permission to change the other record's status, and that record's trigger column and value must match exactly. |
The task ended in timeout | It ran past the table's max execution minutes (default 15). Simplify the instruction, or raise the limit for heavy tasks. |
Tips and best practices
Before scheduling an agent task on hundreds of rows, run it once on a single record with Execute now and check the execution log. Adjust the instruction until you like the result, then apply to the rest.
The cleanest chains use a regular Status column as the trigger — that way humans and agents can both move records along the pipeline, and the next agent picks up automatically.
Two or three sentences focused on what to read, what to do, and where to write the result beats a long paragraph with extra context. The agent already sees the full record.
What's next
Agent Tasks require an AI agent connected to the database. If you haven't built one yet, head to Agents Overview to create one and connect it to this table.
If the work needs to span multiple steps with branching logic or external triggers, look at Automations — they coordinate across services and time, while Agent Tasks focus on what one agent does with one record.