Connecting your agent to WhatsApp is like giving it its own phone line — customers message the number and your agent answers, just like messaging a real person. Your agent can send text, images, files, audio, interactive buttons, and even pre-approved message templates.
 Image: WhatsApp channel export showing a connected phone number
Prerequisites
- A completed agent in the Agent Control Panel (at least the Profile step saved)
- A Facebook Business account (free — you can create one during setup)
- A phone number that is not currently active on WhatsApp (personal or business). If your number is already on WhatsApp, you'll need to deregister it first
Setting Up WhatsApp
There are two ways to connect WhatsApp. Embedded Signup is recommended for almost everyone — it's faster, easier, and Meta provisions everything for you automatically.
Option A — Embedded Signup (Recommended)
Embedded Signup is the official sign-up flow built by Meta. From a single popup, it sets up everything for you automatically — your WhatsApp Business Account, your phone number, the access pass Nirvai needs, and the automatic alert WhatsApp sends Nirvai when a message arrives — all without you touching Meta's developer settings.
What Meta sets up automatically:
- A WhatsApp Business Account (WABA — your business's WhatsApp account with Meta) linked to your Facebook Business
- A phone number registered against your WABA — either an existing number or a new one
- A system user (an automated account Meta uses to act on your behalf) with the right permissions on your Facebook Business
- A permanent access token — a secure access pass scoped to WhatsApp
- The webhook subscription — the automatic alert WhatsApp sends Nirvai the moment a customer messages you
You never have to copy and paste any private passwords or generate access passes manually.
Steps:
- Open your agent in the Agent Control Panel and click the Channels node
- Select WhatsApp from the Meta Platform section
- Choose Business App
- Click Start Setup — a Facebook Login popup opens
- Sign in with the Facebook account that owns (or will own) the Business
- Follow the on-screen WhatsApp Business onboarding:
- Select an existing Business or create a new one
- Select or create a WhatsApp Business Account
- Pick an existing phone number, port one in, or buy a new one
- Verify the number via SMS or voice call
- Confirm permissions — Meta returns you to Nirvai
- Your WhatsApp number appears as Connected on the export card
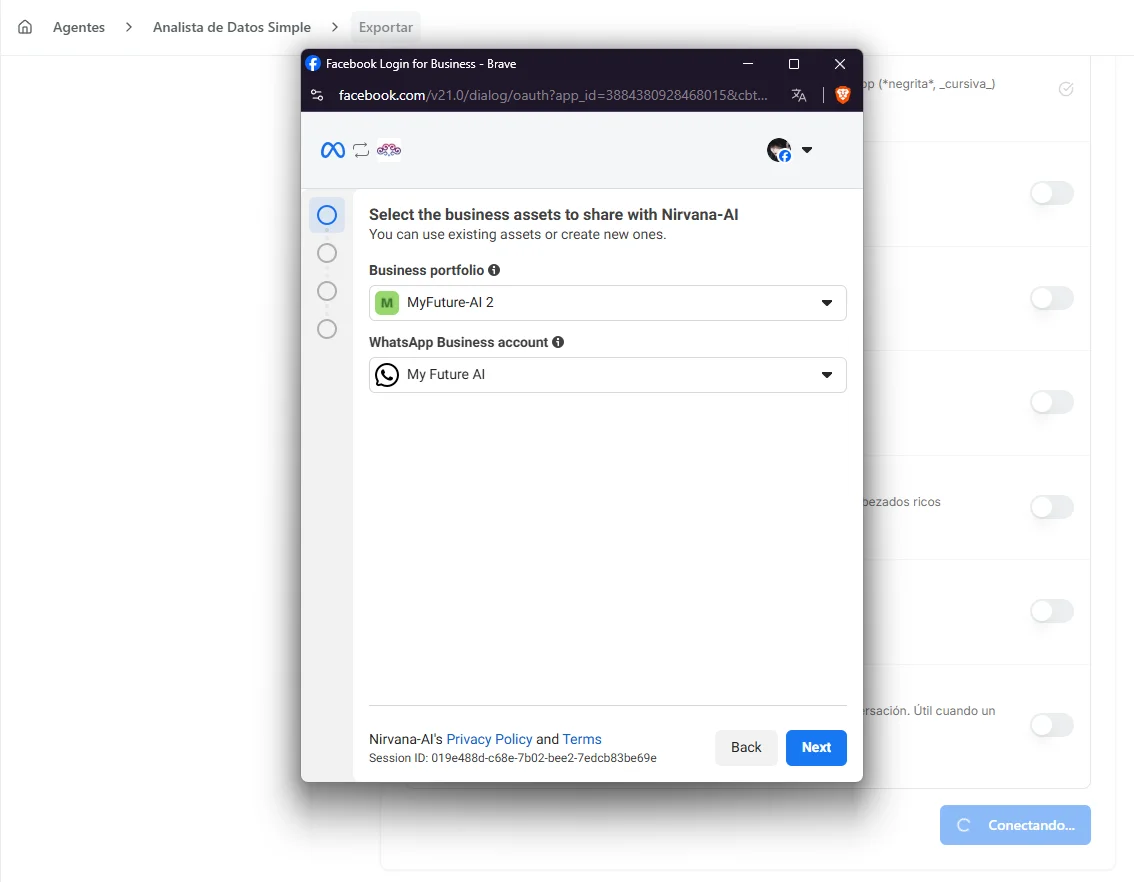 Image: WhatsApp Business App setup flow with Facebook Login popup
Embedded Signup uses your real Facebook Business — the same account where you (or your client) already manage Pages, ad accounts, and other Meta assets. If you don't have one, Meta will help you create it during the popup; it takes a couple of minutes.
Reuse a saved WhatsApp connection
If you've already connected WhatsApp before — or saved it as a Meta Platform Credential — you don't have to go through Facebook Login again. When you choose Business App, any saved WhatsApp connections appear at the top under Use an existing connection.
- Pick your number, then set your message types and follow-ups as usual and press Connect — the agent goes live on that number with no popup.
- A number that's already connected to another agent appears as "Connected to another agent" and can't be selected. Each WhatsApp number links to one agent only — this stops two agents from answering the same phone. To move it, remove it from the other agent first.
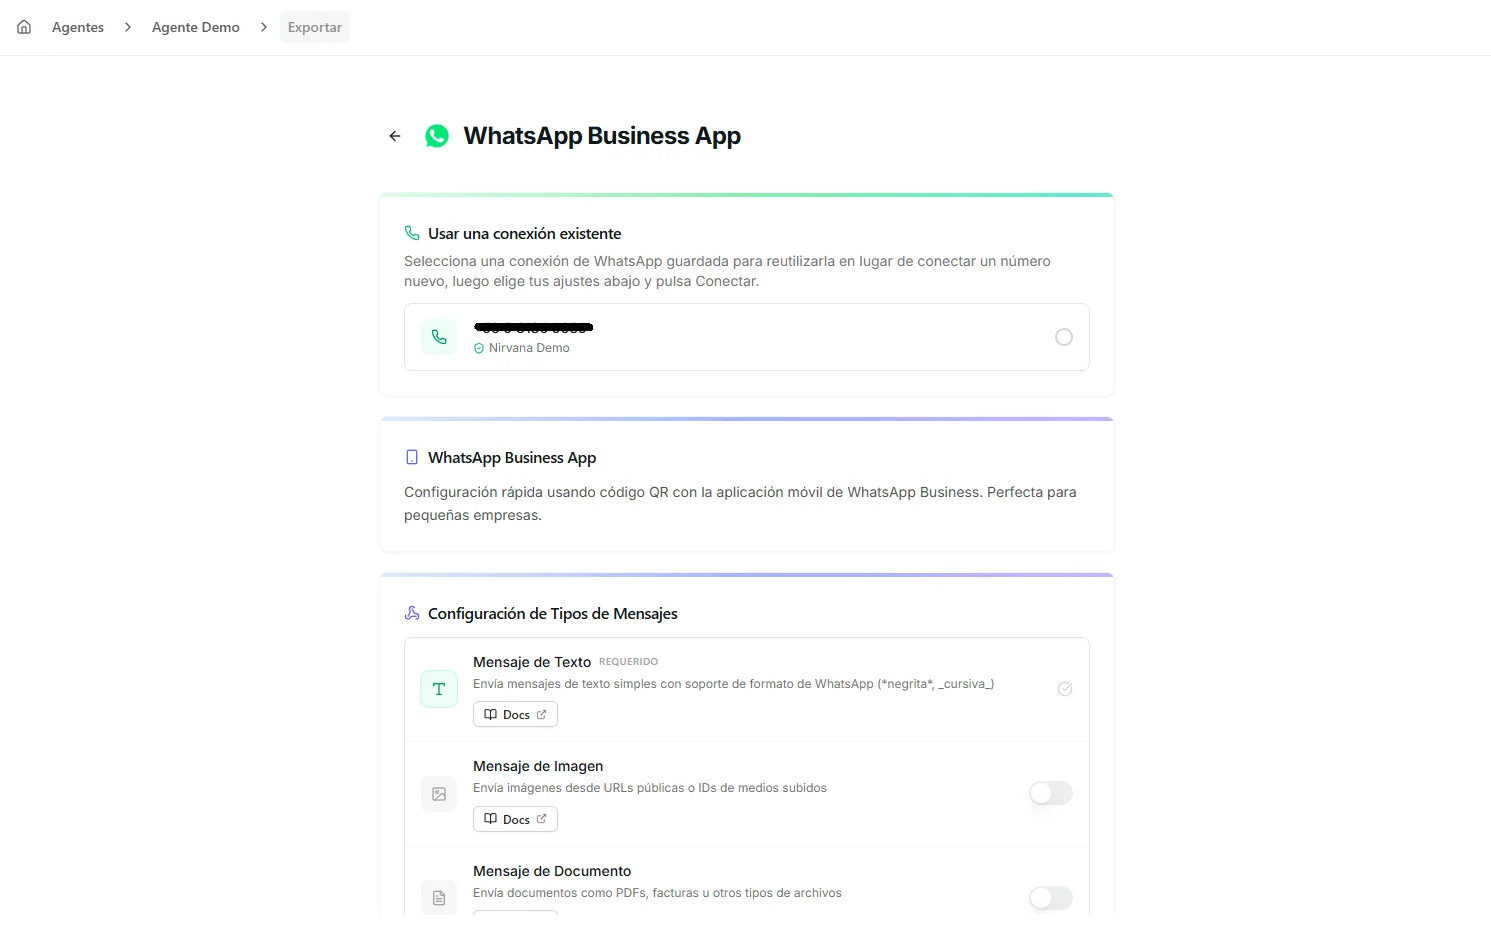 Image: The "Use an existing connection" picker in the WhatsApp Business App setup, listing a saved WhatsApp number you can reuse
Option B — Manual Configuration (SIM Integration)
Choose this only if you already have a WhatsApp Business API setup elsewhere and need to plug Nirvai into it. The Manual flow gives you a guided stepper to enter the credentials yourself.
- Open your agent in the Agent Control Panel and click the Channels node
- Select WhatsApp → SIM Integration
- Follow the guided steps:
- Create a Meta App (if you don't have one)
- Add the WhatsApp product to your app
- Register your phone number
- Create a system user and generate an access token
- Verify your phone number
- Configure the webhook URL provided by Nirvai
- Enter your credentials and save
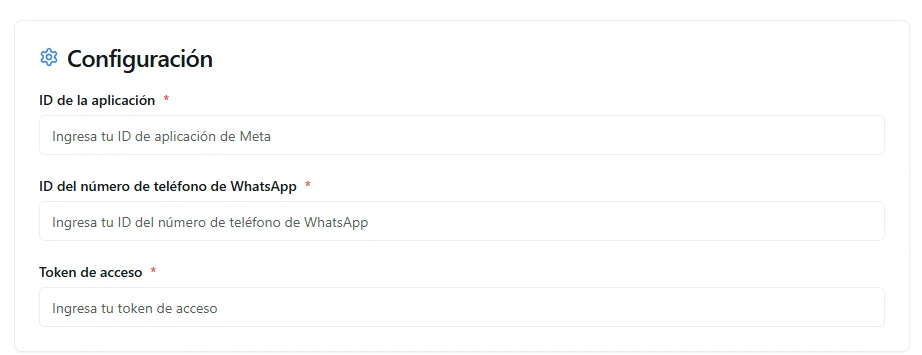 Image: WhatsApp manual configuration stepper
Manual setup involves your Meta Developer Console and several credential copy-paste steps. Use Embedded Signup unless you have a specific reason not to — it's significantly faster and less error-prone.
Message Types
Once your agent is connected, it can send and receive a range of message types. Some are inbound only (the agent reads them), some are outbound only (the agent sends them), and most go both ways.
| Type | Direction | Description |
|---|---|---|
| Text | Both | Plain text messages, with emoji and basic WhatsApp markdown (*bold*, _italic_) |
| Images | Both | Photos, screenshots, generated graphics. Reads via vision, sends from agent files |
| Documents | Both | PDFs, spreadsheets, Word docs, and other file attachments |
| Audio | Both | Voice notes. Inbound audio is transcribed automatically; outbound is sent as a voice message |
| Video | Inbound | Short video messages — the agent extracts frames and analyzes them |
| Interactive Buttons | Outbound | Quick-reply or CTA buttons attached to a message |
| Templates | Outbound | Pre-approved Meta message templates (see below) |
You can toggle which outbound message types are active in your export configuration. Text is always enabled. Disable types you don't want the agent to use — for example, if you never want your agent to send images, turn off the Images toggle.
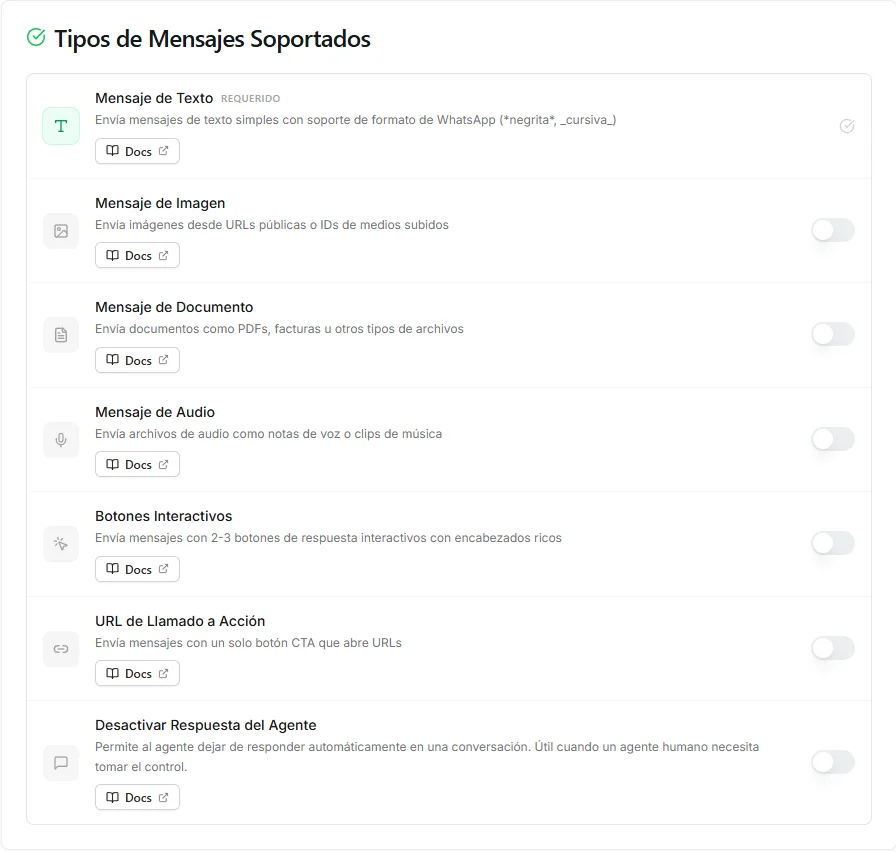 Image: WhatsApp export message types configuration
Inbound is always on. Customers can always send any media type — the agent will process it (transcribe audio, analyze images, read documents). The toggles only control what the agent is allowed to send back.
When a Conversation Starts From an Ad
Some businesses run Meta ads on Facebook and Instagram with a "Send WhatsApp message" button — tap the ad and WhatsApp opens with your business, ready to chat. These are called click-to-WhatsApp ads. It's like a customer walking into your store holding the exact flyer that brought them in — you already know what caught their attention.
When a conversation begins this way, your agent automatically knows it came from an ad, and it stores two identifying details that Meta passes along:
- CTWA_CLID (the click ID) — a unique reference for that specific ad click. Think of it as a receipt number for the exact tap that started the conversation.
- Source ID (the ad or post ID) — identifies which ad (or post) the customer clicked, so you can tell which campaign or piece of content brought them in.
The agent can use these to open more relevantly — for example, greeting the customer in the context of the promotion they clicked, or noting which campaign is driving conversations.
There's nothing to switch on. When the conversation comes from an ad, the context is there for the agent to use; when it's a normal message (someone messaging your number directly), no ad details are attached and the agent simply behaves as usual.
This only applies to conversations that start from a click-to-WhatsApp ad. Regular conversations — where a customer messages your number directly — don't carry any ad information, and nothing changes about how the agent handles them.
WhatsApp Message Templates
WhatsApp requires that businesses use pre-approved message templates to start conversations with users (outbound messages outside the 24-hour customer service window). Templates are reviewed by Meta and must follow their content policies.
What Are Templates?
Templates are structured messages you design in advance. They can include:
- Header — Text, image, video, or document
- Body — The main message text, with optional placeholders for personalization (e.g.,
{{1}}for a customer name) - Footer — Small text below the body
- Buttons — Quick Reply, URL, or Phone Number buttons
Viewing and Sending Templates
- Open a WhatsApp conversation in the Chat View
- Click the Templates button
- Browse your approved templates — you can filter by:
- Status: Approved, Pending, Rejected
- Language: English, Spanish, etc.
- Category: Marketing, Utility, Authentication
- Select a template and fill in any required parameters
- Click Send
 Image: WhatsApp template picker showing approved templates with parameter fields
Template Categories
| Category | Purpose | Example |
|---|---|---|
| Marketing | Promotions, offers, announcements | "Hi {{1}}, check out our new collection!" |
| Utility | Order updates, reminders, confirmations | "Your order {{1}} has been shipped" |
| Authentication | Verification codes | "Your code is {{1}}. Valid for 5 minutes." |
Templates must be approved by Meta before you can use them. Approval usually takes a few minutes but can take up to 24 hours.
Chat View & Human Takeover
The WhatsApp Chat View lets you see all incoming conversations and step in whenever you need to take over from the agent.
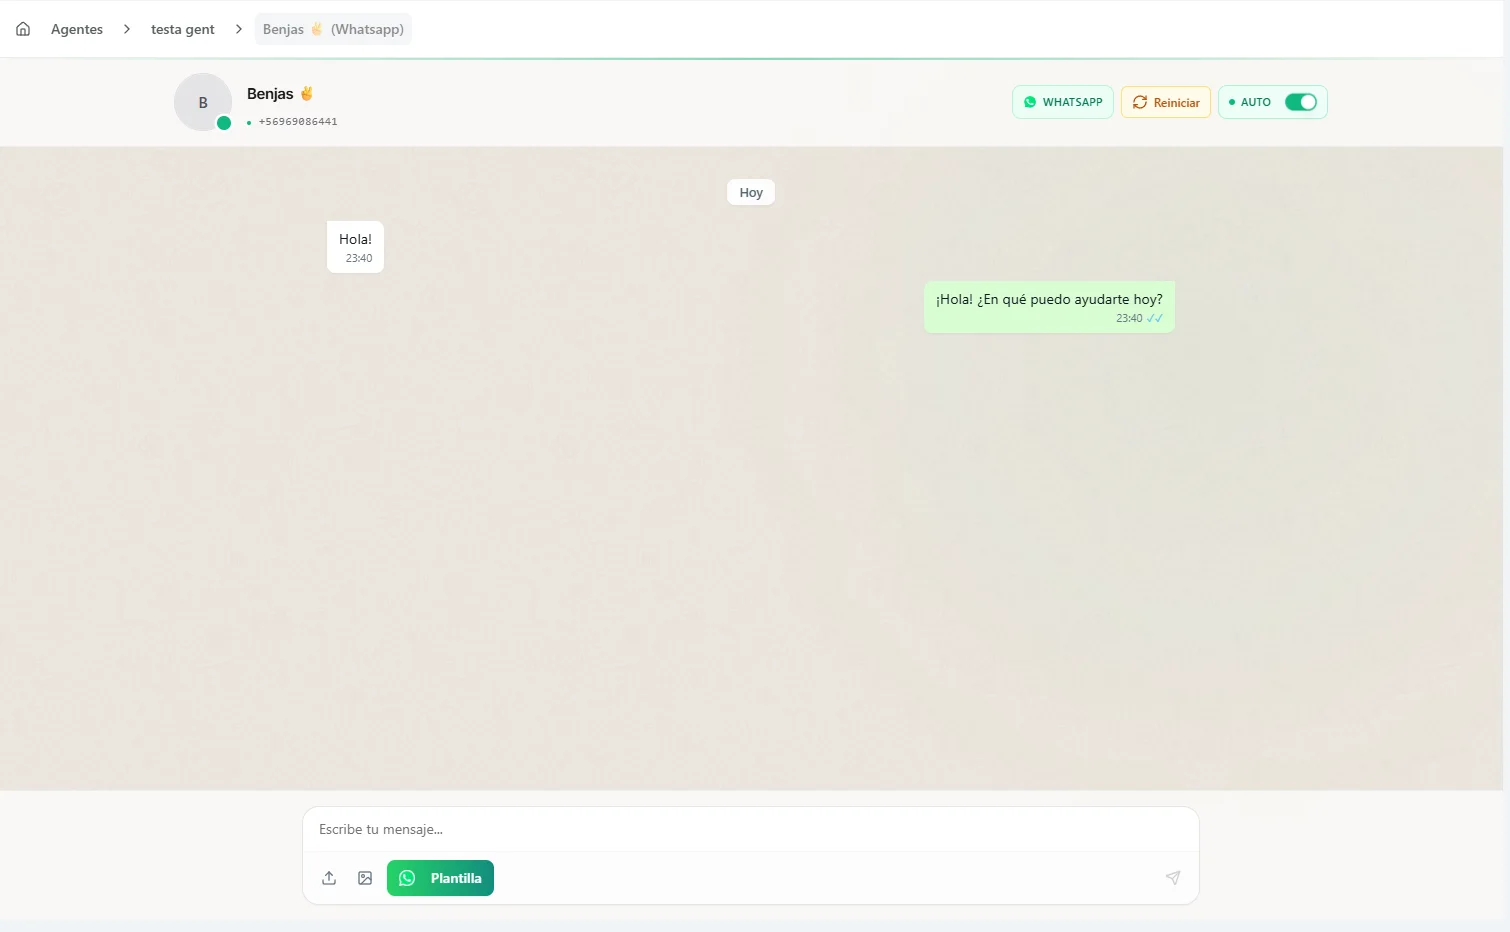 Image: WhatsApp Chat View showing conversations and the agent toggle
Viewing Conversations
- Open your agent in the Agent Control Panel
- Select the WhatsApp export
- You'll see all conversations listed with the latest messages
Pausing the Agent on a Single Conversation (Auto / Manual)
Each conversation has its own toggle. This is per-conversation — switching one conversation to Manual does not affect any others.
| Mode | What Happens |
|---|---|
| Auto (green) | The agent responds automatically to incoming messages on this conversation |
| Manual (gray) | The agent pauses on this conversation — you respond manually as a human |
When you switch a conversation to Manual:
- The agent stops responding for that conversation only
- You can type and send messages directly to the user from the Chat View
- Other conversations continue running with the agent enabled
- You can optionally set a reason for pausing (e.g., "Transferring to support team")
Switch back to Auto when you're ready for the agent to take over again. The agent will see the full history — including the messages you sent manually — so it can pick up the conversation seamlessly.
Use Manual mode for complex situations that need a human touch — billing disputes, sensitive issues, or anything the agent can't handle. The user won't know the difference; messages come from the same WhatsApp number.
Messages You Send From Your Own Phone (Conversation Sync)
Think of this like a shared notebook for the conversation: it doesn't matter whether you reply through Nirvai or straight from the WhatsApp Business app on your own phone — every message ends up in the same place.
When you (or a teammate) message a customer directly from your own WhatsApp Business app — outside of Nirvai — that message is automatically copied into the matching conversation in the Chat View. The history stays complete no matter where you answer from, so you never have to wonder "did I already reply to this person from my phone?"
This is handy when:
- You answer a customer on the go from the WhatsApp app on your phone, but still want that reply on record in Nirvai
- A teammate handles some chats from their phone while the agent handles the rest
- You want one complete history per customer, instead of it being split between your phone and Nirvai
What gets synced
| Message you send from your phone | Appears in the Chat View? |
|---|---|
| Text | ✓ Yes — the full message |
| Images, documents, video | ✓ Yes — with their caption, if any |
| Audio / voice notes | ✓ Yes — shown as a voice message |
| Templates | ✓ Yes — shown by the template's name |
Where synced messages appear
They show up inside the conversation in the Chat View, mixed into the timeline just like the replies you send from Nirvai itself. The agent also sees them as part of the conversation history — so if a conversation is on Manual and you switch it back to Auto, the agent already knows what you said directly from your phone and can pick up smoothly.
Who this works for. Conversation sync depends on a WhatsApp feature (called Coexistence) that lets the WhatsApp Business app on your phone and Nirvai use the same number at the same time. For it to work:
- Your number must be connected through Embedded Signup using the Business App option — the flow that links your existing WhatsApp Business app (Setting Up WhatsApp, above). Numbers connected through Manual configuration don't send these copies.
- The WhatsApp Business app on your phone must be updated to version 2.24.17 or newer. Older versions don't send the copies.
- Keep the WhatsApp Business app installed on the phone — if it's uninstalled, the connection breaks.
There's nothing to switch on — when your setup qualifies, sync happens automatically. If messages you send from your phone aren't showing up in Nirvai, the usual causes are: the number was connected through Manual configuration instead of Embedded Signup → Business App, or the WhatsApp Business app needs updating to version 2.24.17 or newer.
Pause the Entire Channel (Deactivate Without Disconnecting)
Sometimes you need the agent to stop responding on every conversation without disconnecting WhatsApp completely. For example: a holiday break, a temporary issue with your knowledge base, or while you're rolling out a new version of the agent.
Channel deactivation lets you pause the agent across the entire WhatsApp channel — while still keeping all conversations and incoming messages saved for when you're ready to come back.
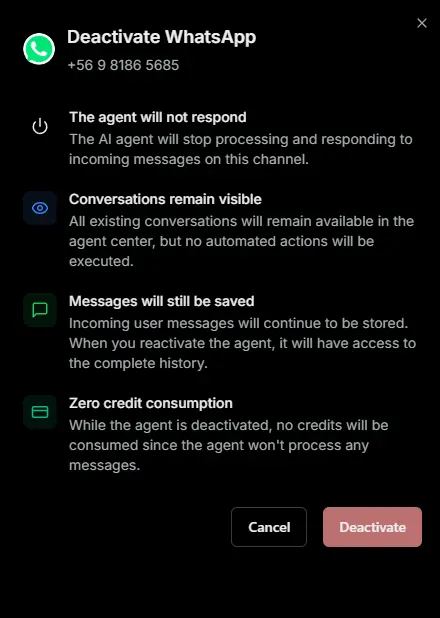 Image: Deactivate the agent's WhatsApp channel — preview of the toggle and its impact
What Happens When You Deactivate
| Behavior | Status |
|---|---|
| The agent stops responding | ✓ Stops on every WhatsApp conversation immediately |
| Incoming messages stay saved | ✓ All messages, files, audio, and media keep being stored |
| Conversations remain visible | ✓ You can still browse the full conversation list and history in the Chat View |
| Credit consumption | ✓ Zero — the agent is never invoked while deactivated |
| The phone number stays connected | ✓ WhatsApp Business setup is preserved; you don't have to re-authenticate |
| You can still send messages manually | ✓ Reply by hand from the Chat View on any conversation |
How to Deactivate
- Open your agent in the Agent Control Panel and select the WhatsApp export
- Toggle the Active switch off on the export card
- A confirmation drawer appears explaining the impact — confirm to apply
- The card dims to indicate the channel is paused
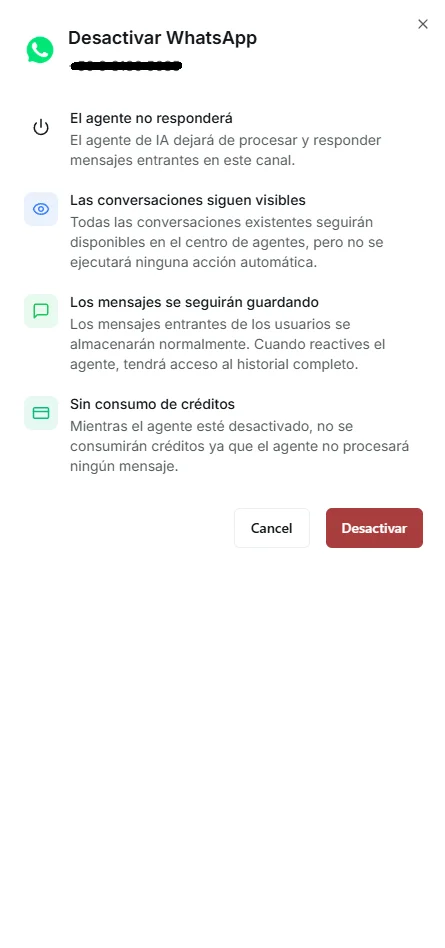 Image: WhatsApp channel deactivation toggle and confirmation drawer
To reactivate, toggle the switch back on. The agent picks up right where it left off, with the full conversation history intact — including any messages received while the channel was paused.
Channel Deactivation vs Manual Mode
These two controls solve different problems. Use the right one for your situation:
| Manual Mode (per conversation) | Channel Deactivation (whole channel) | |
|---|---|---|
| Scope | One specific conversation | All conversations on the channel |
| Best for | A single customer needing human help | Holidays, maintenance, agent issues |
| Other conversations | Continue with the agent | Also paused — none get a response |
| Manual replies | Yes, from the Chat View | Yes, from the Chat View |
| Where to toggle | Inside the conversation view | On the WhatsApp export card |
Managing Your Export
Editing Configuration
Click the edit button on your WhatsApp export to:
- Toggle which outbound message types are active
- View your connected phone number and WABA ID
- Reconfigure credentials if needed
Removing the Export
To disconnect WhatsApp from this agent entirely:
- Open the Channels panel
- Click the delete/remove button on the WhatsApp export
- Confirm the removal
Your WhatsApp Business account stays intact in Meta — only the connection to this agent is removed. The phone number remains registered to your WABA and can be reconnected later (to the same agent or a different one).
If you only need a temporary pause, use channel deactivation (above) instead of removing the export. Deactivating keeps your conversation history, while removing the export disconnects everything.
Troubleshooting
| Issue | Solution |
|---|---|
| Messages not arriving | Check that the channel is active (toggle on the export card). If using Manual setup, verify the webhook URL is configured in your Meta App settings |
| Agent not responding on one conversation | Verify the conversation's toggle is set to Auto in the Chat View |
| Agent not responding on any conversation | Check that the channel itself is active — the export card toggle may be off |
| Template rejected | Review Meta's content policies and resubmit with compliant content |
| Phone number already registered | The number must not be active on another WhatsApp account. Deregister it first |
| A saved number is greyed out ("Connected to another agent") | Each WhatsApp number can be linked to only one agent. Remove the export from the other agent, or pick a different number |
| Facebook Login popup blocked | Allow popups from Nirvai in your browser settings |
| Embedded Signup popup doesn't return | Close the popup and try again. If you switched Facebook accounts mid-flow, sign out of all Facebook accounts and start over |
What's next
To understand Meta's rules behind the scenes — the 24-hour reply window, messaging limits, template approval, and pricing — read the WhatsApp Platform Guide.